What is vcruntime140.dll
“vcruntime140.dll” is a dynamic-link library (DLL) within the Microsoft Visual C++ 2015 Runtime Library (shared by subsequent versions including 2017, 2019, 2022, etc.). Many programs written in Visual C++ rely on this DLL during startup or operation.
If this file is missing, corrupted, or inaccessible, the program may report an error such as: “The code execution cannot proceed because vcruntime140.dll was not found.”
Possible Causes
| Cause | Description |
| Missing or accidentally deleted DLL file | The software installation package failed to install it properly, or it was mistakenly deleted by certain cleanup software. |
| DLL file corruption | File damage caused by virus interference, disk issues, etc. |
| Incomplete installation or upgrade of Visual C++ Redistributable | Installation errors or version mismatch (x86 vs x64). |
| Missing Windows updates / Unpatched operating system | Latest runtime patches not installed. |
| Conflicts or overlapping versions of VC++ runtime libraries | Issues arising from multiple incompatible or overlapping versions of VC++ runtime libraries within programs or the system. |
Common Error Message Examples
“The code execution cannot proceed because vcruntime140.dll was not found. Reinstalling the program may fix this problem.”
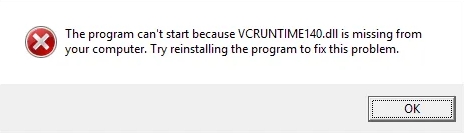
The program cannot start because the vcruntime140.dll file is missing from the system.
Fix 1: Download and Install the Latest Microsoft Visual C++ Redistributable
One of the most reliable solutions for fixing DLL errors is to ensure that you have the latest Visual C++ Redistributable installed on your system. These runtime libraries are required for running applications developed with Microsoft Visual Studio. A missing or outdated redistributable package often causes DLL issues.
Steps to Follow:
1. Visit the official Microsoft Visual C++ Redistributable download page.
2. Download the appropriate version based on your system architecture:
x64 for 64-bit Windows
x86 for 32-bit Windows
3. Run the installer and complete the installation.
4. Restart your PC and relaunch the application.
Pro Tip: Install both versions (x86 and x64) to cover all compatibility bases, especially if you're using 64-bit Windows.
Fix 2: Manually Register the DLL Files
If the DLL files exist but Windows cannot recognize them, they might not be properly registered in the system. Registering the DLL manually ensures Windows knows how to use them, which can resolve runtime errors and boost application stability.
To register the DLL files:
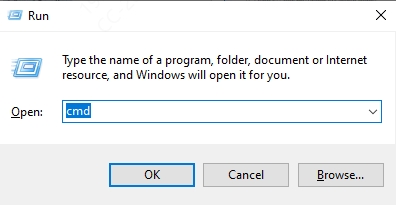
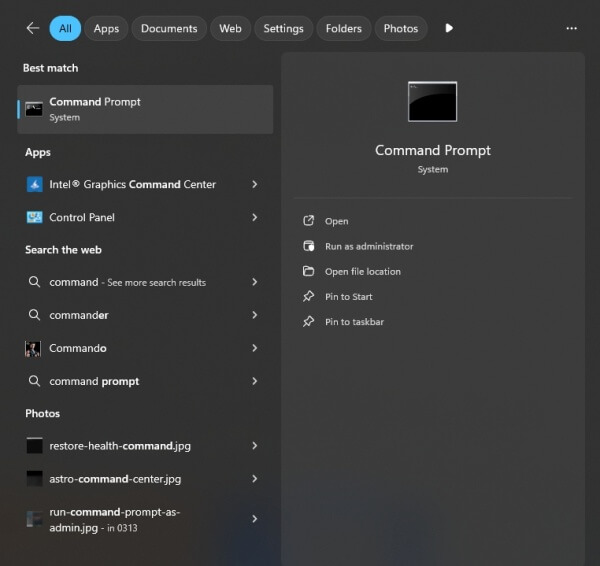
1. Open Command Prompt as administrator by pressing Windows + R, typing cmd, then pressing Ctrl + Shift + Enter.
2. Type and execute these commands:
regsvr32 /u vcruntime140.dll
regsvr32 /i vcruntime140.dll
regsvr32 /u vcruntime140_1.dll
regsvr32 /i vcruntime140_1.dll
This process unregisters and then re-registers the DLLs, helping Windows reestablish correct file paths and runtime behavior.
Fix 3: Reinstall the Application Showing the Error
Sometimes the root cause lies with the application itself. A corrupt installation might fail to reference DLL files correctly, even if they are present in your system.
How to fix it:
Navigate to Control Panel > Programs > Uninstall a Program.
Locate the problematic software and uninstall it.
Restart your computer to remove leftover data.
Download the latest version of the software from its official website.
Install it and launch to verify if the error is resolved.
Reinstalling ensures the program has a fresh environment with correctly linked dependencies and libraries.
Fix 4: Restore the Missing DLL Files from System32 or SysWOW64
Windows stores essential DLL files in System32 (for 64-bit DLLs) and SysWOW64 (for 32-bit DLLs). If vcruntime140.dll or vcruntime140_1.dll is missing from these directories, the application will throw errors even if the redistributable is installed.
Steps:
1. Navigate to:
C:\Windows\System32 (for 64-bit systems)
C:\Windows\SysWOW64 (for 32-bit systems)
2. Search for the two DLL files.
3. If missing, obtain a clean copy from a working Windows PC or a trusted source.
4. Paste the files into the correct folder.
5. Reboot your computer to apply the change.
Make sure you do not overwrite newer versions of the DLLs.
Fix 5: Run System File Checker (SFC) and DISM Tools
Corrupted system files can trigger DLL errors even when the files are technically present. The System File Checker and Deployment Imaging and Servicing Management (DISM) tools are built-in Windows utilities that scan and repair system integrity issues.
Steps for SFC:
Open Command Prompt as administrator.
Enter the following command: sfc /scannow
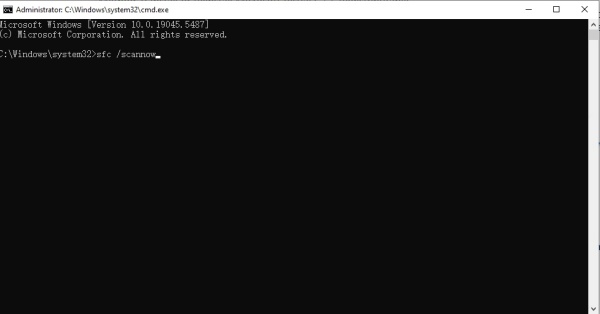
Allow the scan to complete. If any corrupted files are found, the system will attempt to fix them automatically.
Run DISM if SFC fails: DISM /Online /Cleanup-Image /RestoreHealth
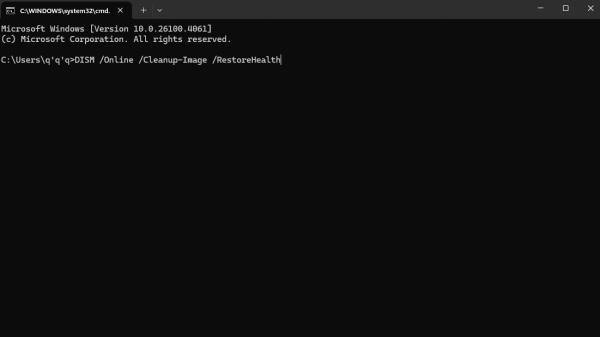
These tools work together to restore your system to a healthy state and eliminate runtime problems caused by faulty system files.
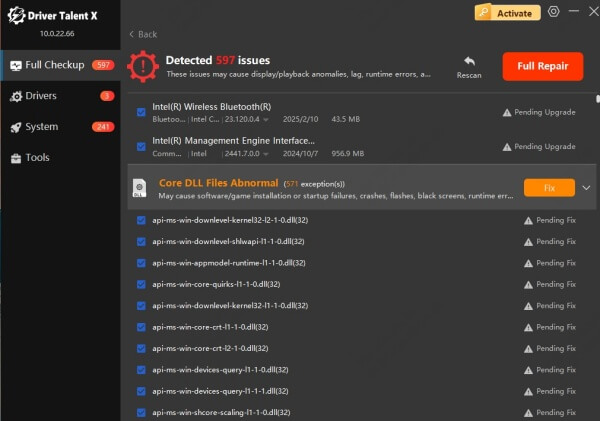
Fix 6: Use Driver Talent – With Built-in DLL Error Repair
If you're looking for a quick and reliable all-in-one solution, Driver Talent stands out as one of the best tools to fix DLL issues and outdated drivers automatically.
Driver Talent now features a dedicated DLL Error Repair function. This powerful feature detects missing or broken DLL files—including vcruntime140.dll and vcruntime140_1.dll—and automatically downloads and replaces them with the correct, verified versions. This eliminates the need for manual file handling or unsafe third-party DLL downloads.
Steps to Repair DLL Errors Using Driver Talent:
Download and install Driver Talent from the official website.
Launch the program and it will automatically detect system issues.
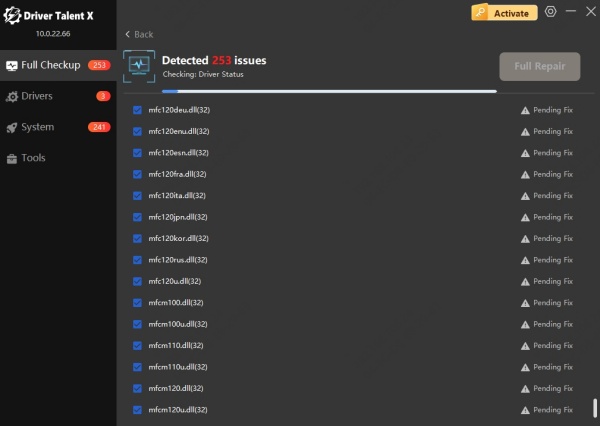
Once the scan completes, go to the Core DLL Files Abnormal tab.
Locate vcruntime140.dll or vcruntime140_1.dll in the results list.
Click Fix to fix the problem instantly.
Restart your PC and relaunch the problematic app.
In addition to DLL repair, Driver Talent can also update drivers, fix missing components, and restore stability to your Windows system—all from one interface.
Fix 7: Check for Windows Updates
System-wide updates often include critical runtime libraries and system fixes. If you're running an outdated version of Windows, some programs may fail due to incompatible or missing dependencies.
Update Your Windows System:
Go to Settings > Update & Security > Windows Update.
Click Check for Updates.
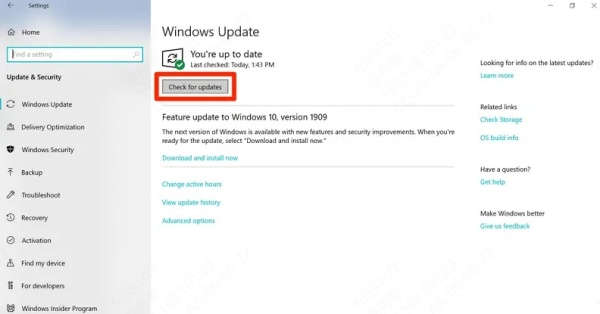
Install any pending updates and restart your PC.
Installing the latest patches ensures your system has all necessary runtime environments for your applications to function correctly.
Fix 8: Restore Windows to a Previous Working State
If the error began appearing after a recent system change—such as an update or installation—you can use System Restore to revert your PC to a previous state where everything worked fine.
To perform a system restore:
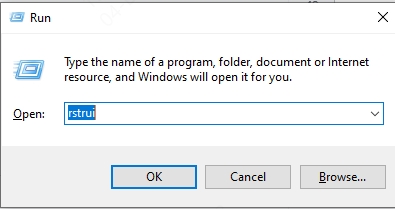
Press Windows + R, type rstrui, and hit Enter.
Follow the wizard to select a restore point before the error started occurring.
Allow the process to complete and restart your PC.
This method is especially useful when the issue arises suddenly after major system or application changes.
Fix 9: Manually Download the DLL Files (Use with Caution)
As a last resort, you can manually download vcruntime140.dll and vcruntime140_1.dll and place them in the appropriate directories. Only use this fix if you're unable to resolve the issue with the above methods.
Steps:
1. Download the DLLs from a trusted source (avoid shady websites).
2. Place the files in:
C:\Windows\System32 for 64-bit systems
C:\Windows\SysWOW64 for 32-bit systems
3. Run the registration commands (see Fix 2).
4. Reboot your system.
Caution: Downloading DLLs from unofficial sources may pose a security risk. Always prioritize verified tools like Driver Talent for safe DLL recovery.
Microsoft Official Recommendations/Links
Microsoft officially recommends installing the Microsoft Visual C++ 2015-2022 Redistributable (separately for x86 and x64) to resolve issues such as “Missing vcruntime140.dll and msvcp140.dll.”
Support articles on Microsoft Docs typically provide the latest redistributable packages and various patches.
Conclusion
The “vcruntime140.dll not found” and “vcruntime140_1.dll was not found” errors can halt your workflow and block access to critical apps. By following these nine robust methods—especially leveraging tools like Driver Talent with its built-in DLL repair feature—you can quickly restore system stability and resume normal operations without frustration or risk.
