When faced with the "Destiny 2 servers are not available" error on PC, it can be frustrating—especially if you're eager to jump into the action. This persistent error message can appear for a variety of reasons, from temporary server maintenance to misconfigured network settings on your computer. In this guide, we’ll walk through all the potential causes and provide comprehensive solutions to help you get back into the game quickly and reliably.
Understanding the "Destiny 2 Servers Not Available" Error
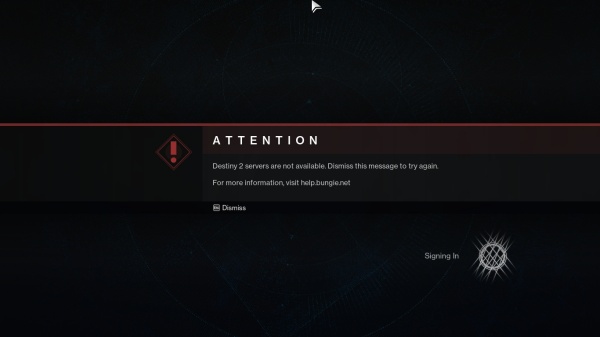
The "Destiny 2 servers not available" error typically means the game client is unable to communicate with Bungie’s servers. While sometimes it's due to backend issues on Bungie's side, it can also be caused by local factors such as DNS errors, corrupted game files, VPN conflicts, outdated software, or firewall restrictions.
Check Bungie’s Server Status First
Before diving into advanced fixes, the first thing you should do is check if the problem is global or specific to your system.
Visit the Official Bungie Help Twitter
Bungie regularly updates their @BungieHelp Twitter account with live service issues, scheduled maintenance, and known bugs.

Use Downdetector
Sites like Downdetector can show if other players are experiencing similar server issues in real-time.
If the servers are down for everyone, the best solution is to wait until service resumes. If not, continue with the fixes below.
Fix 1: Restart the Game and Steam Client
A simple yet effective solution: restart the Destiny 2 game and close the Steam client entirely.
Exit Destiny 2 completely.
Open Task Manager (Ctrl + Shift + Esc) and end all Destiny 2 and Steam-related processes.
Relaunch Steam as administrator.
Start Destiny 2 again.
This can resolve minor software glitches or broken sessions causing server disconnection.
Fix 2: Clear and Flush DNS Cache
Sometimes, corrupted DNS data can prevent your game client from reaching Destiny 2 servers. Refresh your DNS with these steps:
1. Press Windows + R, type cmd, and press Ctrl + Shift + Enter to open Command Prompt as administrator.
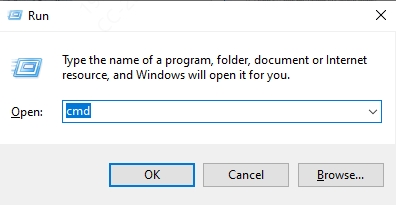
2. Enter the following commands one by one:
ipconfig /flushdns
ipconfig /release
ipconfig /renew
3. Restart your PC after running these commands.
This will refresh your network stack and can restore your ability to connect to Bungie’s servers.
Fix 3: Change Your DNS to Google or Cloudflare
Your ISP’s DNS may be unreliable. Switch to a more stable DNS to see if that resolves the issue:
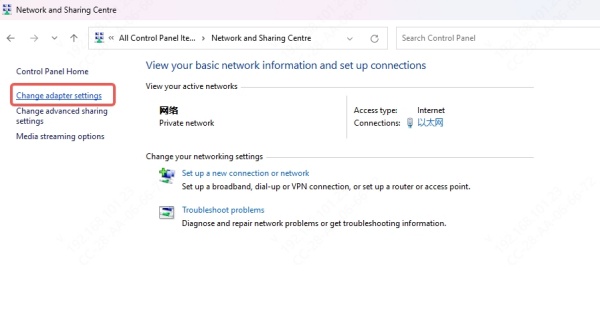
1. Go to Control Panel > Network and Sharing Center > Change adapter settings.
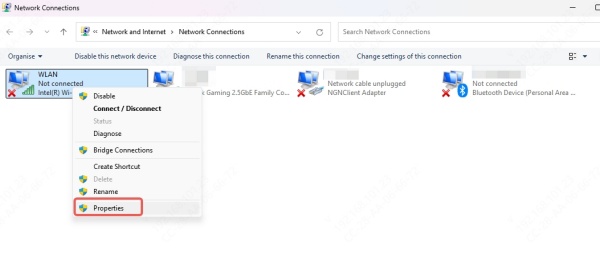
2. Right-click your active network and select Properties.
3. Select Internet Protocol Version 4 (TCP/IPv4) and click Properties.

4. Choose Use the following DNS server addresses:
Preferred DNS server: 8.8.8.8
Alternate DNS server: 8.8.4.4 (Google)
Or try: 1.1.1.1 and 1.0.0.1 (Cloudflare)
5. Click OK and restart your computer.
Fix 4: Disable VPNs or Proxies
If you are using a VPN or proxy service, disable it and try connecting to Destiny 2 again. Bungie’s servers often reject connections from masked or geo-altered IP addresses, which can trigger this error.
Steps:
Exit all VPN applications.
Disable Windows proxy settings:
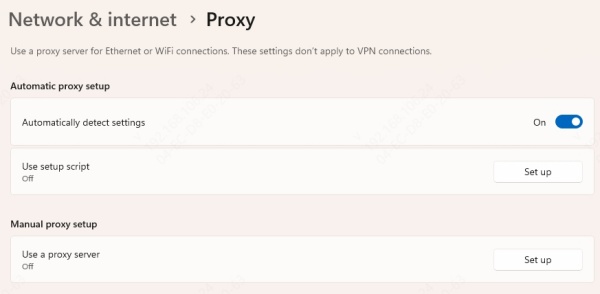
Go to Settings > Network & Internet > Proxy.
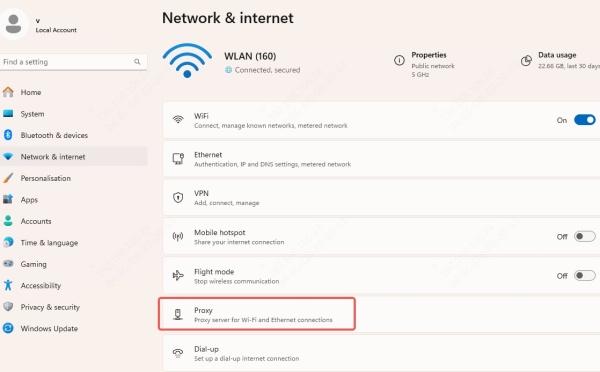
Ensure both Automatically detect settings and Use a proxy server are turned off.
Fix 5: Update Your Network and Graphics Drivers
Outdated or corrupted drivers can interfere with Destiny 2’s network operations. Keep both your network adapter and graphics drivers up to date.
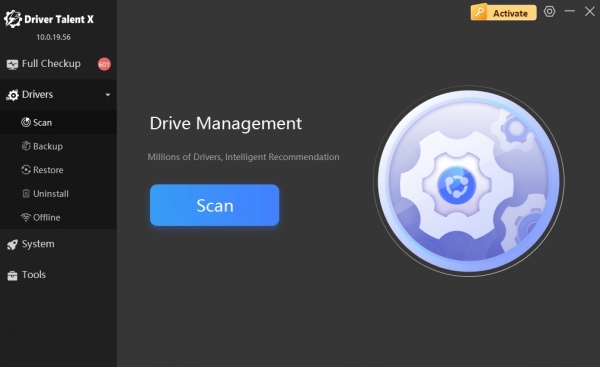
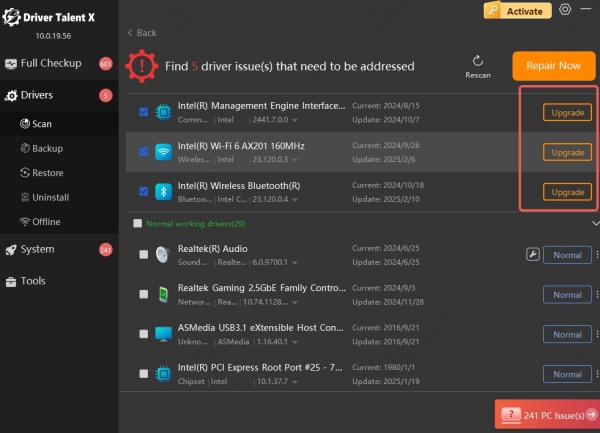
Use Driver Talent to Simplify Driver Updates
Driver Talent is a powerful tool that detects outdated, missing, or broken drivers and updates them with a single click. Here’s how to use it:
Download and install Driver Talent from the official website.
Launch the software and click Scan.
Once the scan is complete, click Update All to install the latest drivers.
Restart your computer.
Updating drivers can fix network communication issues and improve game performance overall.
Fix 6: Adjust Firewall and Antivirus Settings
Sometimes, your firewall or antivirus can block Destiny 2’s connection attempts.
Add Destiny 2 as an Exception
Go to Control Panel > Windows Defender Firewall > Allow an app or feature.
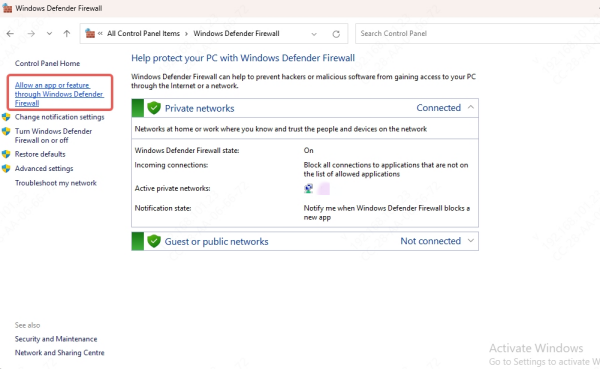
Ensure both Destiny 2 and Steam are allowed through private and public networks.
If using third-party antivirus, open the software and whitelist the Destiny 2 executable.
You can also temporarily disable the antivirus to test if it’s causing the issue (be sure to re-enable it afterward).
Conclusion
The "Destiny 2 servers are not available" error on PC can stem from a wide array of causes, but with the right troubleshooting steps, it’s usually resolvable. From checking server status to flushing DNS and updating drivers with tools like Driver Talent, these methods will cover nearly every scenario. Use this guide to identify and fix the issue fast—so you can get back to grinding Lightfall, joining raids, or just enjoying the universe of Destiny 2 without interruption.
