Headphones are an essential audio output device for laptops, widely used in various scenarios. However, many users encounter issues where headphones produce no sound or aren't recognized after being plugged in, affecting the overall experience.
This article analyzes the common causes of headphone issues on laptops and provides multiple effective solutions to help you quickly restore normal headphone functionality.
1. Causes of Headphones Not Working on Laptops
Loose or damaged headphone jack
Audio driver is outdated or malfunctioning
Audio output not set to headphones
System muted or incorrect volume settings
Faulty headphones
Windows audio service malfunction
Conflicts or incorrect audio settings
2. Solutions to Fix Headphones Not Working on Laptops
Solution 1: Check Headphone and Jack Hardware
Ensure the headphone plug is fully inserted into the laptop jack.
Test with a different pair of headphones to rule out hardware failure.
Check the headphone port for dust or looseness; clean it or try another port (e.g., front panel jack or USB headphones).
Solution 2: Update the Audio Driver
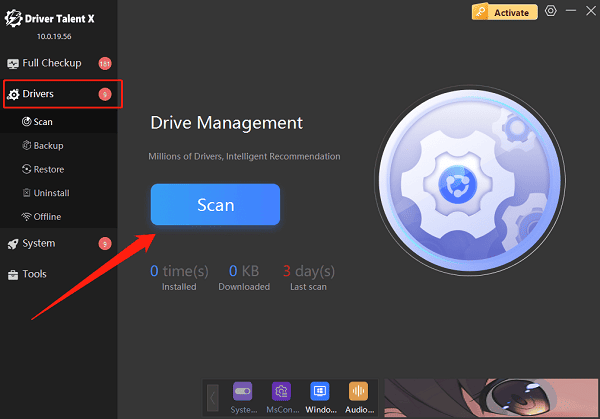
Outdated, corrupted, or incompatible audio drivers are a common cause of headphone issues. It's recommended to use the Driver Talent X tool, which can automatically detect, download, and install the most suitable drivers for your system.
Click the Download button to get the latest version of Driver Talent X, then install and launch the program.
Go to the Drivers section and click "Scan" to check all driver statuses.

Locate the audio driver in the results and click "Upgrade".
Restart your computer after the update to ensure the new driver takes effect.
Solution 3: Set Default Audio Output Device
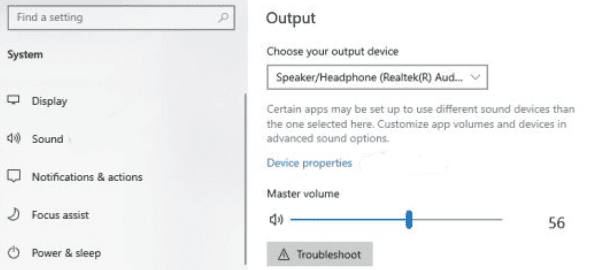
Right-click the volume icon on the taskbar and select "Open Sound Settings".
Under "Output", choose your headphones and set them as the default device.

Replug the headphones and ensure the system switches the output correctly.
Solution 4: Check Windows Audio Service
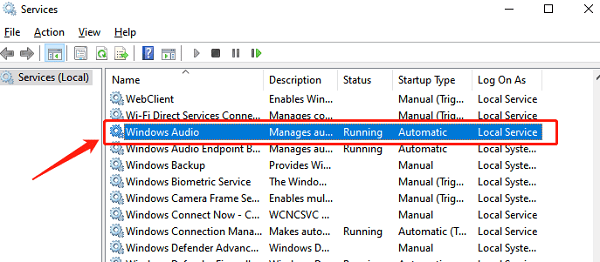
Press Win + R, type "services.msc", and press Enter.
Find "Windows Audio" and ensure its status is Running.

If not, right-click and select Start, then set the Startup type to Automatic.
Solution 5: Disable Audio Enhancements
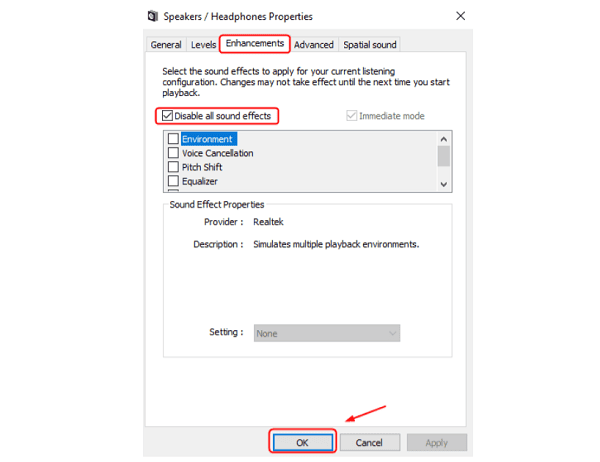
Go to Control Panel > Hardware and Sound > Sound.
Select the headphone device and click "Properties".
Switch to the "Enhancements" tab and check "Disable all sound effects".

Click "Apply" and confirm.
Solution 6: Run Audio Troubleshooter
Open Settings > Update & Security > Troubleshoot > Other troubleshooters.
Find "Playing Audio" and click "Run the troubleshooter".

Follow the instructions to diagnose and fix audio issues.
3. Frequently Asked Questions (FAQ)
Q1: What if the system doesn't switch to headphones after plugging them in?
A: Try setting the default audio device manually or updating the audio driver to ensure compatibility.
Q2: What if the headphone jack is broken?
A: Consider using USB or Bluetooth headphones as alternatives to bypass the physical port.
Q3: What if there is static noise or the sound is cutting in and out?
A: Check if the headphone cable or jack is damaged, update the sound card driver, and disable audio enhancements.
Headphones not working on a laptop is often caused by hardware connection issues, driver problems, or incorrect system settings. Users can resolve this by checking headphone connections, setting the correct default device, and updating drivers.
It's recommended to regularly update drivers and maintain hardware to ensure stable audio output and enjoy high-quality sound performance.
