You open your laptop, go to connect to WiFi, and the wireless adapter is gone — or you check Device Manager and find it sitting there with a disabled icon. No warning, no explanation. It either happened after a Windows update, after waking from sleep, or seemingly on its own. The fix is usually straightforward. The more important question is whether it stays disabled after you re-enable it, because that points to a different underlying cause. This guide covers both: how to re-enable the adapter immediately, and how to stop it from disabling itself again.
Fix 1: Re-enable the Adapter in Device Manager
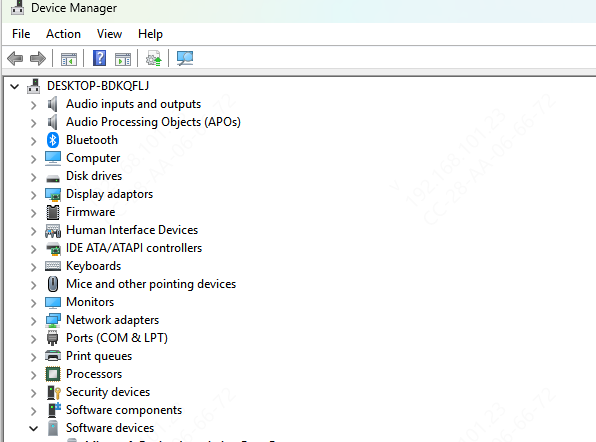
Press Win + X and select Device Manager from the menu. Expand Network Adapters. Look for your wireless adapter in the list — it will typically be labeled with the chipset name such as Intel Wireless-AC, Realtek 802.11ac, or Qualcomm Atheros
A greyed-out icon with a small downward-pointing arrow indicates the device is disabled. Right-click it and select Enable device. Wait a few seconds for the adapter to initialize. Check the taskbar WiFi icon to confirm networks are now visible
Fix 2: Re-enable via Network Connections
Press Win + R, type ncpa.cpl, and press Enter. The Network Connections window opens and shows all network adapters on the system. If the wireless adapter appears greyed out with a red X or shows the label Disabled beneath it, right-click it and select Enable
The adapter will reinitialize and the icon will return to an active state. This method works identically to Device Manager but through a different interface
Fix 3: Disable Power Management on the Adapter
There are two power management settings to change, and both need to be addressed.
The first is the adapter-level setting. Open Device Manager, expand Network Adapters, right-click your wireless adapter, and select Properties. Go to the Power Management tab
Uncheck the option that says Allow the computer to turn off this device to save power. Click OK

The second is the system-level USB power setting. Open the Control Panel and go to Power Options
Click Change plan settings next to your active plan, then click Change advanced power settings. Expand USB settings, then expand USB selective suspend setting. Change the value to Disabled. Click Apply and OK

Restart the PC after making both changes. The adapter should now remain enabled regardless of inactivity or sleep cycles.
Fix 4: Update or Reinstall the Wireless Adapter Driver
When the adapter is disabled by Windows automatically — rather than by a user action — a corrupted or incompatible driver is usually the cause. Windows disables hardware when its driver produces errors to prevent system instability. Updating or reinstalling the driver resolves this.
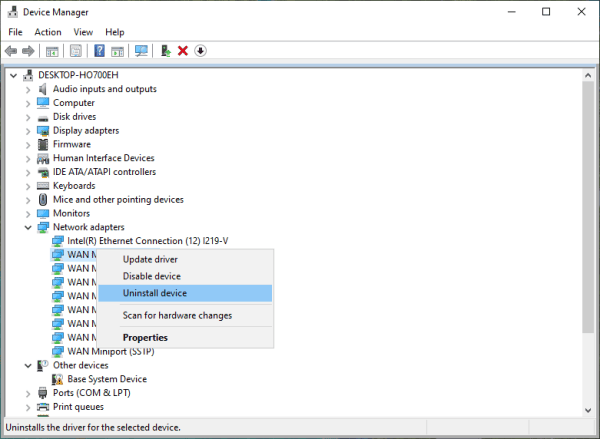
Device Manager method: open Device Manager, expand Network Adapters, right-click the wireless adapter, and select Update driver. Choose Search automatically for drivers. If Windows finds an updated driver online, install it and restart
If the update doesn't resolve the issue, perform a full reinstall. Right-click the adapter and select Uninstall device. If an option to delete the driver software appears, check it. Restart the PC and Windows will attempt to reinstall the driver automatically
When Windows cannot find the correct driver or keeps installing an incompatible generic version, use Driver Talent X. It reads the adapter's hardware ID directly and matches it to the exact correct driver for your wireless chipset and Windows version
This is the most reliable approach when the driver has been repeatedly corrupted by Windows updates

Fix 5: Check Airplane Mode and Physical WiFi Controls
On laptops, check for a physical switch on the side of the chassis that controls the wireless radio
Some older laptop models have this hardware switch. Also check your keyboard for an Fn key shortcut with a wireless symbol — pressing it accidentally can disable the WiFi radio entirely at the hardware level, and no software fix will restore it until the key combination is pressed again
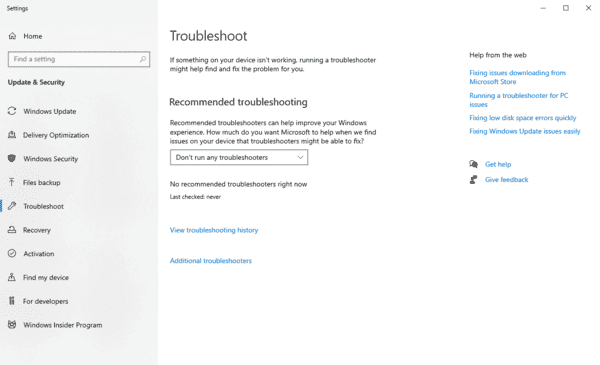
Fix 6: Run the Windows Network Troubleshooter
On Windows 10, go to Settings, then Update and Security, then Troubleshoot, then Additional troubleshooters. Select Internet Connections and click Run the troubleshooter
On Windows 11, go to Settings, then System, then Troubleshoot, then Other troubleshooters. Click Run next to Internet Connections
Fix 7: Reset Network Settings
For cases where the adapter keeps disabling after all the above fixes, a deeper network configuration issue may be preventing stable operation. Resetting the network stack clears corrupted settings that individual fixes can't reach.
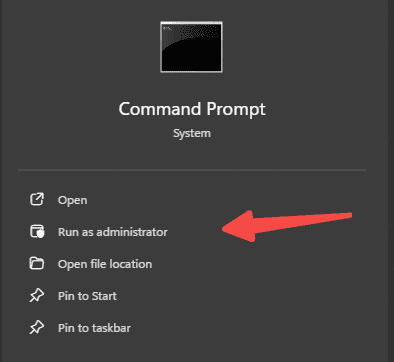
Press Win + S and type cmd. Right-click Command Prompt and select Run as administrator. Run these two commands, pressing Enter after each:
netsh winsock reset
netsh int ip reset
Restart the PC after both commands complete
Conclusion
A disabled wireless adapter is fixed in under two minutes in most cases — re-enable it through Device Manager or the Network Connections window and check the power management settings if it keeps recurring. When the driver is the underlying cause, Driver Talent X installs the correct wireless adapter driver automatically and prevents the repeated corruption that makes the adapter keep disabling after Windows updates.
