If you're facing the "Voicemeeter device output not working" error, you're not alone. This issue can disrupt streaming, podcasting, and gaming setups by preventing proper audio routing. In this comprehensive guide, we'll walk through proven solutions, from Windows audio settings to Voicemeeter troubleshooting, helping you fix the problem and restore smooth, reliable audio performance.
Understanding Why the Voicemeeter Output Is Not Working
Voicemeeter acts as a virtual audio mixer, but it relies heavily on precise driver configurations and correct Windows audio settings. When the output device suddenly stops working, it could be due to:
Misconfigured output routing
Windows sound settings conflict
Faulty audio drivers
Sample rate mismatch
Recent Windows updates interfering with virtual devices
Corrupted Voicemeeter configuration files
Identifying the exact cause can save you time and prevent further system-wide audio issues.
Method 1: Check Output Device Selection in Voicemeeter
One of the most frequent causes of Voicemeeter output issues is simply an incorrect output device selection. Voicemeeter allows you to choose multiple output devices (A1, A2, A3), but if these aren't properly configured or connected, no audio will be routed—even though everything else seems fine. Users often experience silence due to switching headphones, changing USB devices, or updating drivers without reassigning these outputs.
Open Voicemeeter.
Look at A1, A2, and A3 output device selections at the top right.
Click on A1 and make sure you select the correct physical output device (such as your speakers or headphones).
If you're unsure which output is correct, open Windows Sound Settings and check the name of your default output device under "Output".
Tip: Use WDM options first, as they tend to be the most stable and lowest latency.
Method 2: Set Voicemeeter as Default Playback Device
When Voicemeeter isn't set as the default playback device in Windows, system audio bypasses the software entirely, resulting in no output. Many applications route audio based on this setting, and if it's not configured correctly, it can break your entire virtual mixing setup.
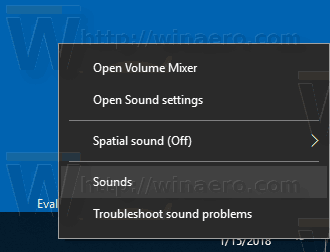
Right-click the speaker icon in the taskbar.
Select "Sounds" or "Sound Settings".
In the Playback tab, locate Voicemeeter Input (VB-Audio Voicemeeter VAIO).
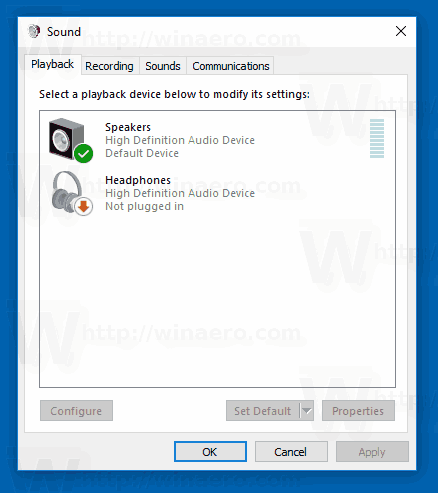
Right-click it and choose "Set as Default Device" and "Set as Default Communication Device".
This ensures all audio is routed into Voicemeeter before going to your selected hardware output.
Method 3: Restart Voicemeeter and Audio Engine
Sometimes, even when everything seems configured correctly, Voicemeeter's internal audio engine can freeze or fail due to driver conflicts or background services. In these cases, a simple restart of the application may flush out glitches or stale configurations.
Close Voicemeeter completely.
Open Task Manager, end any lingering Voicemeeter or VB-Audio processes.
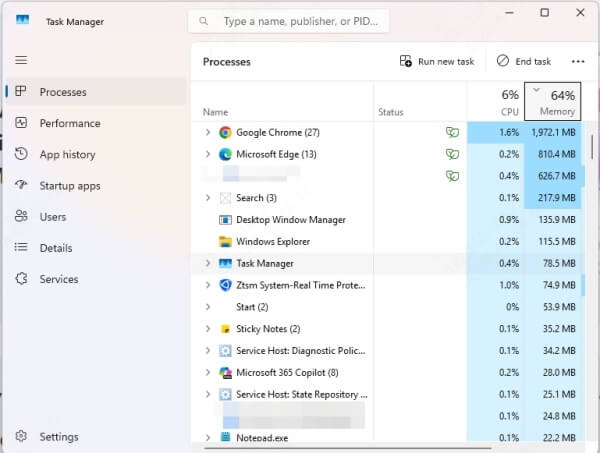
Reopen Voicemeeter as an administrator.
Reassign output devices and check if the issue persists.
Important: Sometimes multiple restarts may be necessary after a Windows update or driver change.
Method 4: Reinstall or Update Voicemeeter and Virtual Audio Drivers
Outdated or corrupted virtual audio drivers can lead to the Voicemeeter device output not working error. This problem often stems from incompatible driver updates, Windows patches, or manual file modifications.
Step 1: Uninstall Voicemeeter
Go to Control Panel > Programs and Features.
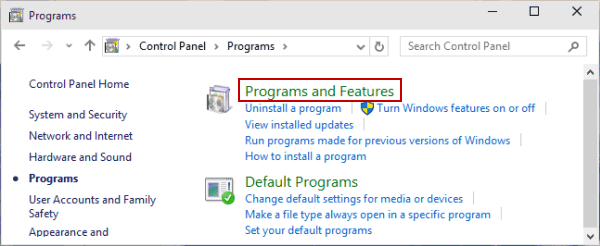
Uninstall Voicemeeter and any VB-Audio Cable drivers.
Reboot your system.
Step 2: Reinstall Voicemeeter
Download the latest Voicemeeter version from the official VB-Audio website.
Install Voicemeeter and restart your computer again.
Step 3: Reinstall Virtual Audio Cables
If you use VB-Audio Cable, make sure to reinstall it after Voicemeeter is set up.
Method 5: Check Windows Privacy and App Permissions
Windows has enhanced privacy and security settings in recent updates, sometimes blocking microphone and audio access to apps like Voicemeeter or OBS. These restrictions may prevent your software from accessing audio devices, leading to output silence.
Go to Settings > Privacy > Microphone.
Ensure that "Allow apps to access your microphone" is enabled.
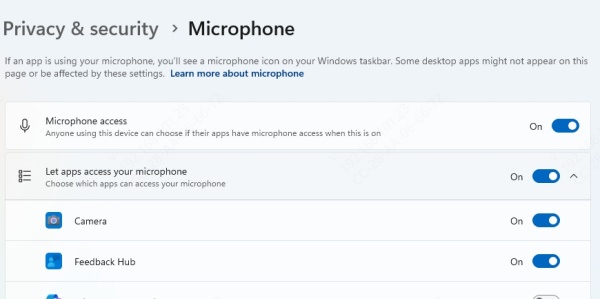
Repeat the same for Settings > System > Sound > Advanced Sound Options > App Volume and Device Preferences and ensure Voicemeeter is allowed to use the correct input/output.
Method 6: Match Sample Rates Between Voicemeeter and Windows
One of the most technical yet overlooked causes of the Voicemeeter output issue is a sample rate mismatch. Voicemeeter and your playback devices must operate at the same sample rate (e.g., 44100 Hz or 48000 Hz). A mismatch leads to unstable connections, popping sounds, or complete silence.
In Voicemeeter, go to Menu > System Settings/Options.
Note the sample rate listed at the top (e.g., 48000 Hz).
Now go to Sound Settings > Device Properties > Additional Device Properties > Advanced Tab.
Set the default format to match Voicemeeter's sample rate.
Apply and restart Voicemeeter.
Method 7: Reset Voicemeeter Settings to Default
Voicemeeter offers powerful customization options, but with great flexibility comes the risk of misconfiguring routing, gain staging, or device mappings. Over time, custom presets or experimental settings may lead to a broken configuration. Resetting the software to its default state gives you a clean slate, eliminating corrupted preferences or legacy routing paths that prevent audio from flowing correctly.
1. Open Voicemeeter.
2. Go to Menu > Reset Settings or manually delete the Voicemeeter.xml config file:
3. Navigate to: C:\Users\[YourName]\AppData\Roaming\Voicemeeter
4. Delete or rename the config file.
5. Restart Voicemeeter and reconfigure your input/output devices.
Method 8: Use Driver Talent to Fix Audio Driver Issues
Sometimes the root cause lies in outdated or broken audio drivers. To avoid manually searching, we highly recommend using Driver Talent, a powerful and user-friendly tool to scan, repair, and update your drivers automatically.
Key Features of Driver Talent:
Scans your entire system for outdated or incompatible drivers.
Allows one-click repair, update, or reinstall of audio drivers.
Automatically backs up drivers before making changes.
Optimized specifically for resolving audio and device-related conflicts.
How to Use Driver Talent:
Download and install Driver Talent from the official website.
Launch the software and click Scan.
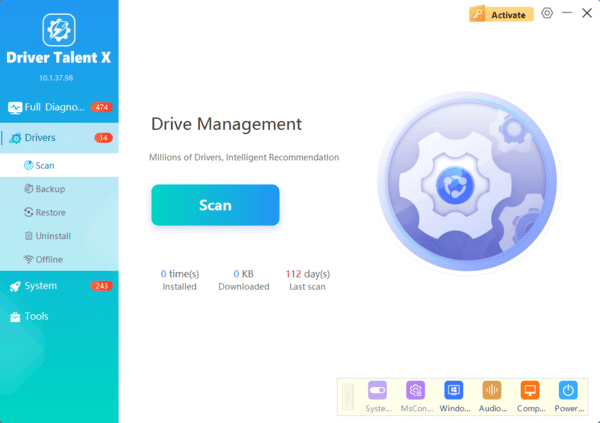
After scanning, locate your audio device drivers and click Update or Repair.

Restart your PC to apply the updates.
Driver Talent ensures your Voicemeeter device output is supported by the latest drivers, reducing risk of compatibility errors.
Method 9: Disable Exclusive Mode in Windows Sound Settings
Some applications request exclusive control over audio devices, preventing Voicemeeter from accessing them properly. This is especially common with professional DAWs, game clients, and conference software. Disabling exclusive mode allows Voicemeeter to share the audio device with other apps, ensuring consistent access to output streams.
1. Go to Sound Settings > Device Properties > Additional Device Properties.
2. Navigate to the Advanced tab.
3. Uncheck:
"Allow applications to take exclusive control of this device"
"Give exclusive mode applications priority"
4. Apply changes and restart Voicemeeter.
Method 10: Reassign Audio Devices in Apps Like OBS, Discord, etc.
Even after fixing Voicemeeter internally, if your external applications are still pointing to the wrong devices, audio will fail to reach the output. Many programs, including OBS Studio, Discord, Zoom, and streaming tools, store device preferences that need to be manually updated to reflect Voicemeeter's virtual inputs and outputs.
In OBS, go to Settings > Audio, assign:
Mic/Aux Input: Voicemeeter Output (VB-Audio Voicemeeter VAIO)
Desktop Audio: Voicemeeter Input
In Discord, go to User Settings > Voice & Video, and assign:
Input: Voicemeeter Output
Output: Voicemeeter Input
Incorrect routing here may make it seem like Voicemeeter is not working, even when it is.
Final Thoughts
The "Voicemeeter device output not working" issue is typically fixable with a methodical approach. From adjusting software settings and checking drivers to utilizing advanced tools like Driver Talent, resolving the issue doesn't need to be complex. Always ensure your system drivers are updated, match sample rates, and verify your app routing settings.
If you've tried all methods and still experience issues, consider reaching out to the VB-Audio support community or reinstalling Windows audio frameworks. But in most cases, following the steps above will get your Voicemeeter back to working flawlessly.
