Running the Windows network troubleshooter and receiving "There might be a problem with the driver for the Wi-Fi adapter" is frustrating because Windows identifies the problem but cannot fix it automatically. The message means the WiFi adapter driver is corrupted, outdated, incompatible, or missing. The most common trigger is a Windows Update replacing the working driver with a generic Microsoft version. Other causes include driver corruption after an abrupt shutdown, a Windows feature upgrade that wiped the driver, or a partial installation that left the adapter in an error state.
Fix 1: Update the Driver via Device Manager
Press Win + X, open Device Manager, expand Network Adapters, right-click the WiFi adapter, and select Update driver, then Search automatically for drivers. Restart after the update and rerun the troubleshooter.

Fix 2: Reinstall the WiFi Adapter Driver Manually
Download the replacement driver before uninstalling — without it ready, the PC has no WiFi and no way to download anything afterward.
For laptops, go to the laptop manufacturer's support site, enter the model number, find the WLAN driver for the correct Windows version, and download it. Common adapter brands are Intel Wireless, Realtek RTL, Qualcomm Atheros, and MediaTek. For desktops, get the driver from the network card or motherboard manufacturer's support page
Once downloaded, open Device Manager, right-click the WiFi adapter, select Uninstall device, check "Delete the driver software for this device," and restart. After the restart, run the downloaded installer as administrator, restart again, and rerun the network troubleshooter to confirm the message is gone

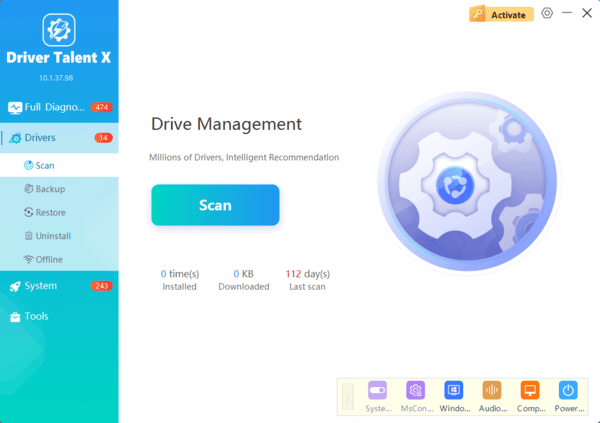
Fix 3: Fix the WiFi Driver Automatically with Driver Talent X
When the manufacturer's site is unclear, the installer keeps failing, or the adapter model is hard to identify, Driver Talent X finds the correct driver by hardware ID and installs it automatically. If no WiFi is available, connect via Ethernet cable or USB tethering from a phone first.
Download and install Driver Talent X. Open Driver Talent X, go to the Drivers tab, and click Diagnose. Find the WiFi adapter in the scan results and click Full Repair. Restart the PC and rerun the troubleshooter
Driver Talent X installs the manufacturer-matched driver rather than the generic Microsoft version, which is why it succeeds when the Device Manager update method fails
Fix 4: Roll Back the WiFi Adapter Driver
If the error started immediately after a Windows Update, rolling back the driver restores the version that was working before.
Open Device Manager, right-click the WiFi adapter, select Properties, go to the Driver tab, and click Roll Back Driver if it is available. Confirm, restart, and test
To prevent Windows from replacing the driver again, press Win + R, type gpedit.msc, navigate to Computer Configuration, Administrative Templates, Windows Components, Windows Update, and set "Do not include drivers with Windows Updates" to Enabled
Fix 5: Disable and Re-enable the WiFi Adapter
Open Device Manager, right-click the WiFi adapter, select Disable device, wait ten seconds, then re-enable it
Test the connection. If the error persists, try uninstalling the device without deleting the driver software and restarting — Windows reinstalls from cached files on next boot. If the problem returns immediately, the cached driver is also corrupted and a full reinstall is needed
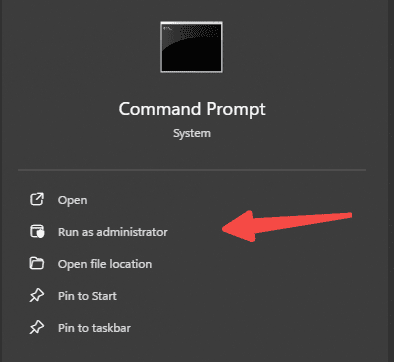
Fix 6: Reset TCP/IP Stack and Winsock
When the driver is repaired but no internet access is restored, the network stack may have separate corruption.
Open Command Prompt as administrator and run:
netsh winsock reset
netsh int ip reset
ipconfig /flushdns
Restart and rerun the troubleshooter.
Fix 7: Check Hardware Switch and BIOS
If none of the software fixes work, the adapter may be disabled at the hardware level. On laptops, check for a physical WiFi switch on the chassis or a keyboard shortcut — commonly Fn + F2 — that toggles the adapte
Also check BIOS: restart, press the BIOS key (F2, F10, or Delete), find the Wireless LAN setting, enable it if disabled, and save
Conclusion
The "there might be a problem with the driver for the Wi-Fi adapter" message will not resolve without driver action. Fix 2 and Fix 3 are the primary solutions — manual reinstallation from the manufacturer's site or automated repair via Driver Talent X. Roll Back Driver is the fastest fix when a Windows Update is the confirmed cause.
