Have you ever tried to connect to Wi-Fi, only to be met with the dreaded message: “Windows wireless service is not running on this computer”?
This issue is more common than you’d think—especially on Windows 10. It can turn your productive day into a frustrating mess. But don't worry, this guide will help you understand what’s going on and how to fix it step by step.
Part 1. Common Error Messages
Depending on your version of Windows, you might see slightly different versions of the same message:
“The Windows Wireless Service is not running on this computer.”
“Windows 10 wireless service not running”
“Wi-Fi doesn’t have a valid IP configuration”
All of these mean one thing: your system can’t manage Wi-Fi connections like it’s supposed to.
Part 2. What Causes the Wireless Service Not Running Error?
Let’s break down the usual suspects:
1. Disabled WLAN AutoConfig: This is the service that tells Windows how to handle Wi-Fi. If it’s off, wireless won’t work—simple as that.
2. Outdated or Corrupted Drivers: Drivers are like translators between your hardware and the operating system. If they’re out of date or broken, no Wi-Fi for you.
3. Corrupted System Files: Random shutdowns, malware, or botched updates can mess up essential files—like the ones that power your wireless services.
4. Recent Windows Updates or Glitches: Sometimes an update does more harm than good. Wireless services might get disabled or misconfigured.
5. Misconfigured Network Settings: Wrong DNS, IP settings, or manual changes can all mess things up under the hood.
Part 3. How to Fix “Windows Wireless Service is Not Running”
Method 1 – Restart Your Computer
Before diving into deeper troubleshooting, always start simple. A system restart can fix temporary glitches, reload essential services, and resolve minor conflicts that may be causing the wireless service to stop working.

Method 2 – Run the Network Troubleshooter
Windows has a built-in Network Troubleshooter designed to automatically detect and resolve common internet-related problems. If the wireless service is acting up, this tool might quickly identify the issue and fix it for you.
Press Windows + I to open Settings.
Go to Network & Internet > Status.
Click Network troubleshooter.
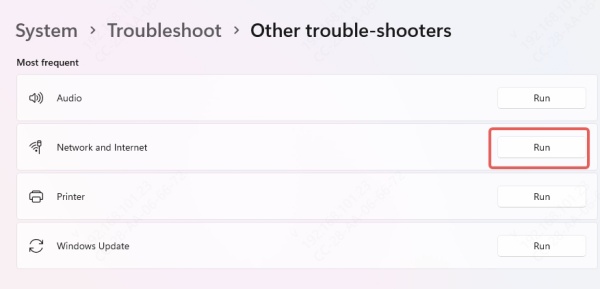
Windows might be able to identify and fix the issue on its own.
Method 3 – Start the WLAN AutoConfig Service
The WLAN AutoConfig service is responsible for discovering, connecting, and configuring wireless networks. If this service is disabled or not running, you’ll be unable to connect to Wi-Fi. Restarting or enabling this service often solves the problem.
Using Services.msc
Step 1. Press Windows + R, type services.msc, and hit Enter.
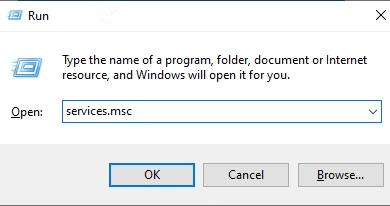
Step 2, Find WLAN AutoConfig in the list.
Step 3. Right-click and choose Start (or Restart).
Step 4. Double-click to set the Startup Type to Automatic.
Using Command Line
Step 1. Open Command Prompt (Admin).
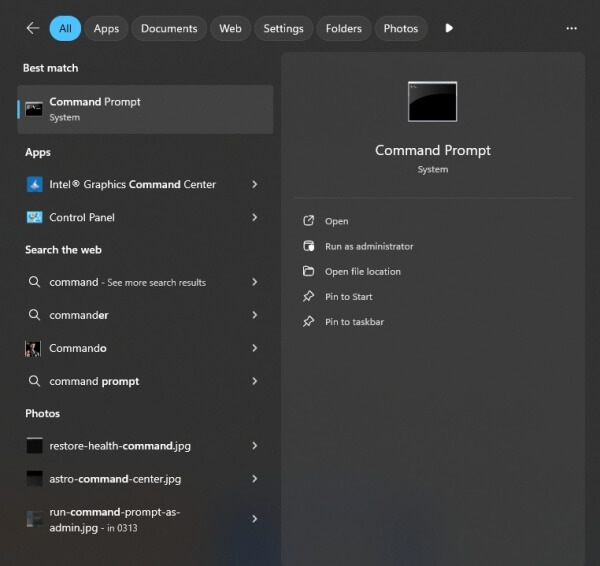
Step 2. Type: net start wlansvc
Method 4 – Update or Reinstall Network Drivers
Outdated, missing, or corrupted drivers can prevent your wireless adapter from working correctly. Updating or reinstalling these drivers ensures your system can properly communicate with the Wi-Fi hardware.
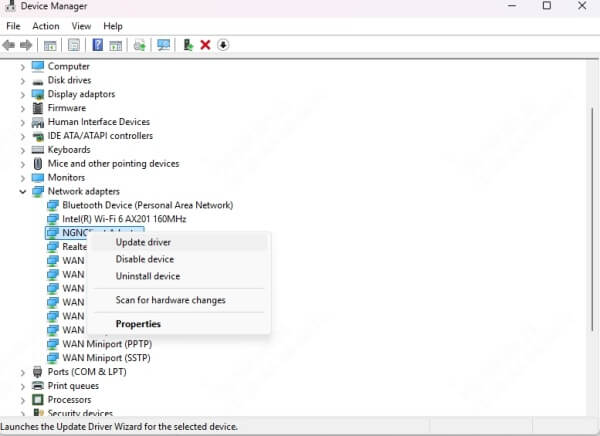
Manual Method via Device Manager
Press Windows + X and select Device Manager.

Expand Network adapters.
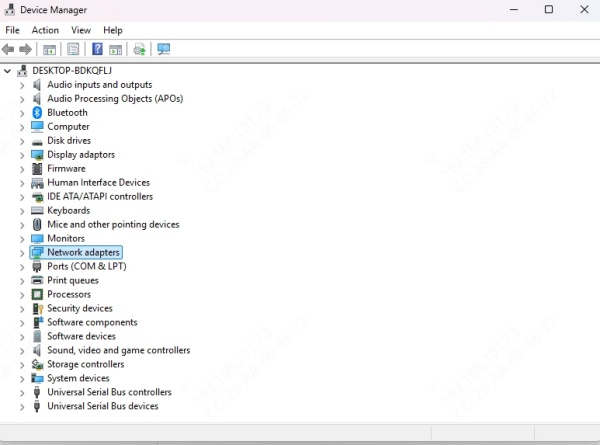
Right-click your wireless adapter and click Update driver.
Use a Driver Updating Tool
Tools like Driver Talent can automatically detect outdated drivers and install the correct versions with one click.
Steps with Driver Talent:
Step 1. Download and install Driver Talent.
Step 2. Click Scan.

Step 3. Update the wireless driver.
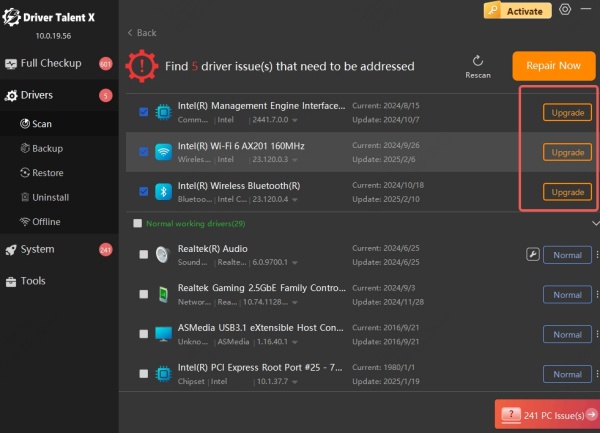
Step 4. Restart your PC.
Method 5 – Reset Network Settings
If your network settings are misconfigured due to software changes or manual errors, resetting them to factory defaults can help restore connectivity. This will remove any custom IP or DNS configurations that might be causing conflicts.
Go to Settings > Network & Internet > Status.
Scroll down and click Network reset.
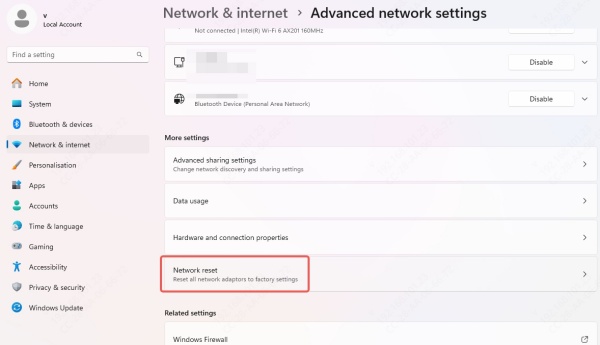
Follow the instructions and restart.
Method 6 – Run System File Checker (SFC Scan)
Corrupted or missing system files can disrupt essential Windows services, including networking components. The System File Checker (SFC) scans your system and automatically repairs any issues it finds.
Open Command Prompt as administrator.
Type: sfc /scannow

Wait for it to scan and fix errors.
Method 7 – Check for Malware
Some types of malware can disable essential services, block Wi-Fi connections, or corrupt system files. Running a full antivirus scan can help remove harmful software that might be interfering with your wireless service.
Method 8 – Perform a System Restore
If your wireless service stopped working after a recent change—like installing new software or updates—using System Restore to roll back your PC can undo those changes and fix the issue.
Type System Restore in the Start Menu.
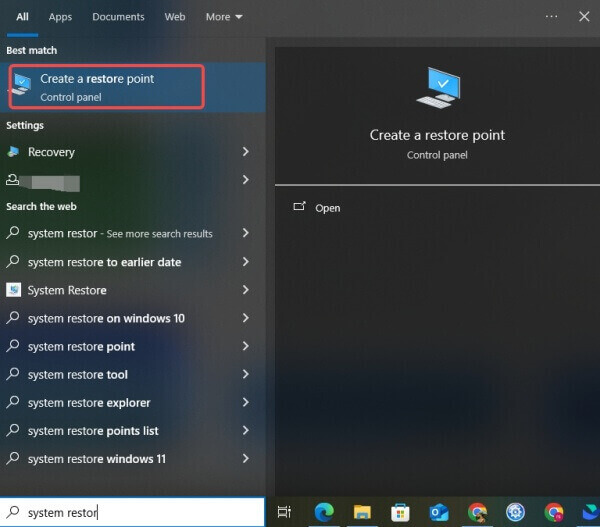
Follow the prompts to restore your PC.
Conclusion
The “Windows wireless service is not running on this computer” error can feel like a dead-end, but it’s usually fixable with a few simple steps. From restarting your WLAN AutoConfig to updating your drivers, these fixes work for most people.
And Driver Talent provides the easiest way to solve network adapter driver issue, don't forget to give it a try!
