While using Windows 10, some users may encounter an issue where disk usage reaches 100%. When this happens, programs open slowly, the system responds sluggishly, or becomes completely unresponsive. This article provides several practical solutions to help you quickly identify the cause and effectively resolve the high disk usage issue.
1. Common Causes of 100% Disk Usage
Faulty drivers or disk hardware failure
Windows Search or Superfetch (SysMain) service consuming resources
Improper virtual memory settings
Background applications frequently reading/writing to the disk
Overactive antivirus software performing excessive scans
2. Detailed Solutions
Update Device Drivers:
Some outdated or incompatible drivers may cause abnormal disk usage, leading to the 100% disk usage issue in Windows 10. It's recommend to use Driver Talent X to save time and avoid the risk of downloading or installing incorrect drivers.
Click the button below to download the latest version of Driver Talent X, install and launch the software.
In the "Drivers" section, select "Scan" to automatically detect the status of all drivers.
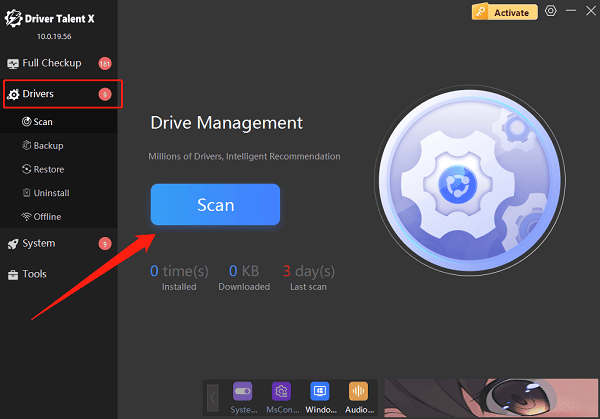
Locate your disk driver in the scan results and click the "Upgrade" button.
After updating, restart your computer to ensure the new driver takes effect.
Check Disk for Errors:
Open File Explorer and locate the drive you want to check (e.g., C:).
Right-click on the disk icon and select "Properties".
In the Properties window, click the "Tools" tab.
Under "Error checking", click the "Check" button.
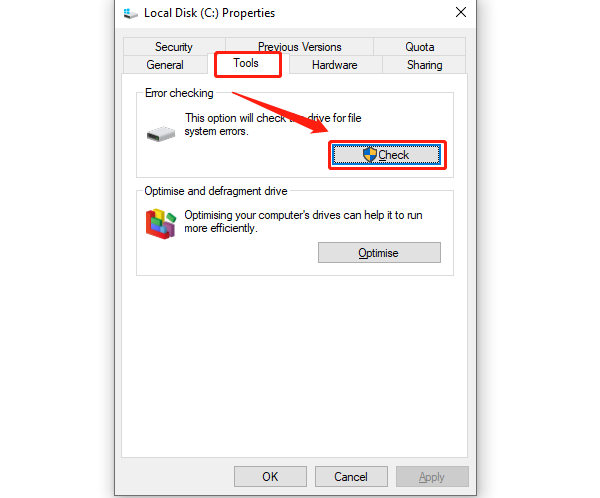
If Windows reports no errors, you can still choose "Scan drive" to detect potential issues.
If errors are found, follow the prompts to fix them.
Disable Superfetch Service:
Press Win + R, type "services.msc", and hit Enter.
In the Services window, locate "Superfetch" (called "SysMain" in newer Windows versions).
Right-click on "Superfetch" or "SysMain" and select "Properties".
Under Startup type, choose "Disabled".
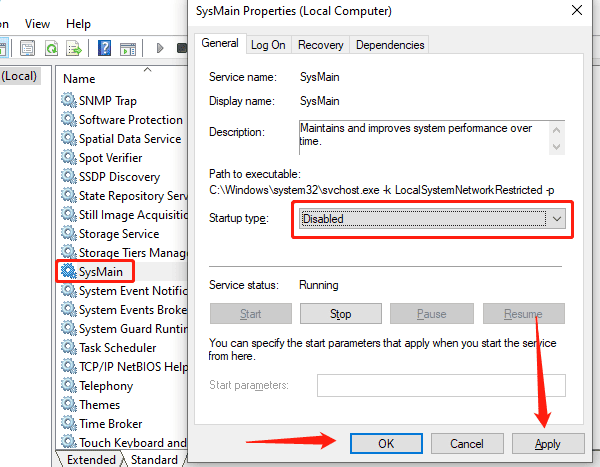
Click "Apply", then "OK".
Restart your computer to apply the changes.
Note: Disabling Superfetch can reduce disk usage in some cases but may impact program preloading performance.
Adjust Virtual Memory Settings:
Press Win + X and select "System".
In System Settings, click "Advanced system settings".
In the popup window, under the Performance section, click "Settings".
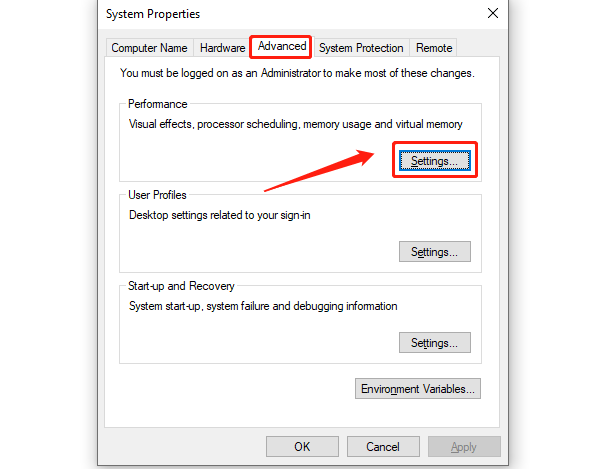
In the Performance Options window, switch to the "Advanced" tab and click "Change".
Uncheck "Automatically manage paging file size for all drives".
Select the drive you want to adjust, then check "Custom size".
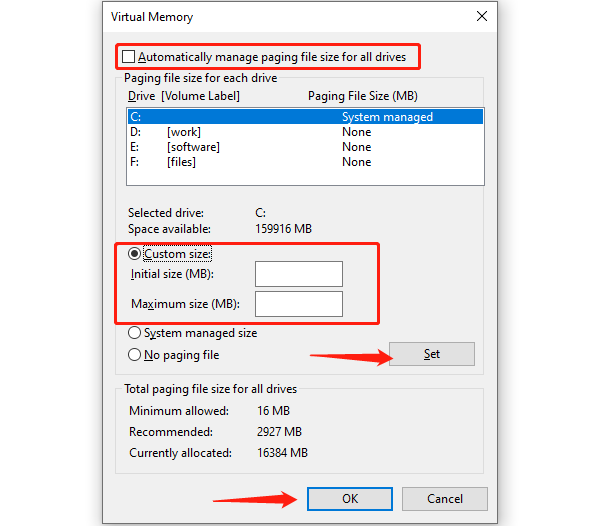
Enter an initial and maximum size (recommended: 1.5 to 2 times your physical RAM).
Click "Set", then "OK".
Check Task Manager for Resource Usage:
Press Ctrl + Shift + Esc to open Task Manager.
Click the "Performance" tab to view CPU, memory, disk, and network usage.
If disk usage is close to 100%, switch to the "Processes" tab.
Select processes with high disk usage and click "End Task" to close unnecessary applications (Be careful not to end essential system processes).
3. Final Recommendations
Regularly clean up temporary system files
Avoid running multiple heavy applications in the background
Consider upgrading from an HDD to an SSD for a significant performance boost
The 100% disk usage issue in Windows 10 is common, but it can often be resolved or avoided with proper system settings and maintenance. The methods above apply to most scenarios, and it's recommended to follow them step-by-step. If the problem persists, consider backing up your data and reinstalling Windows, or seek help from professional technical support for further diagnosis.
