When a Brother printer is not connecting to WiFi, it disrupts productivity and causes unnecessary frustration. Whether you're setting up a new printer or troubleshooting an existing one, this guide offers step-by-step solutions for all known connectivity issues. If your Brother printer will not connect to WiFi, or you keep seeing errors like "Brother printer does not connect to WiFi", this article covers all angles with actionable advice.
Why Brother Printer Won’t Connect to WiFi
Several factors can cause a Brother printer not to connect to WiFi, including incorrect network settings, firmware issues, or router compatibility problems. Let’s explore the most common reasons:
Incorrect WiFi password entered
Weak or unstable wireless signal
Incompatible wireless encryption
Outdated printer firmware
DHCP conflicts or IP address assignment errors
Firewall or antivirus interference
Router settings blocking new device connections
Preliminary Checks Before Troubleshooting
Before diving into more technical fixes, complete the following checks:
Ensure WiFi is Working
Verify that your wireless network is active and other devices can connect without issues.
Restart Your Printer and Router
Power-cycle both your printer and router. Unplug them for 60 seconds and power back on to clear memory errors.
Check for Interference
Keep the printer close to the router and away from thick walls, microwaves, or Bluetooth devices.
Confirm Printer Supports WiFi
Ensure your model has wireless functionality enabled. Some Brother models require manual activation.
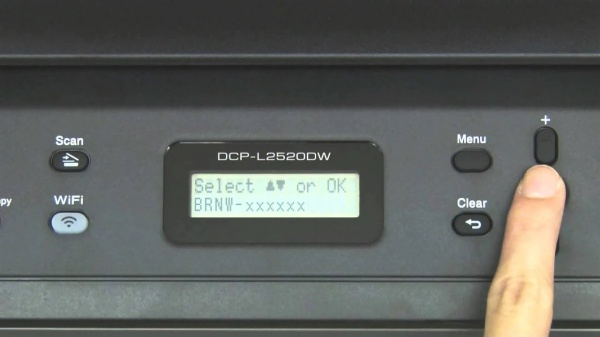
Method 1: Reconnect Brother Printer to WiFi via Control Panel
If you're encountering connectivity issues with your Brother printer, the first and most direct method is to reconnect your printer to WiFi through its built-in control panel. This manual approach helps ensure you’re selecting the correct network and entering credentials accurately.
Steps:
Press the Menu or Settings button on the printer.
Go to Network > WLAN > Setup Wizard.
When prompted, select your WiFi network from the list.
Enter your WiFi password using the printer’s keypad.
Press OK and wait for confirmation: "Connected" or "Connection OK".
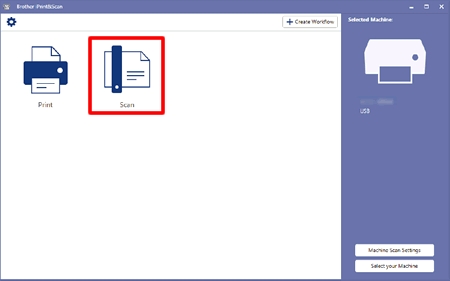
Method 2: Connect Using Brother iPrint&Scan App
If your printer doesn’t have a screen or you're more comfortable using a smartphone, the Brother iPrint&Scan app offers a user-friendly way to configure your printer wirelessly.
Steps:
Download and install the app from Brother’s official site or the app store.
Launch the app and follow the on-screen prompts.
Choose WiFi Network Setup.
Let the app detect your printer.
Input your network credentials when prompted.
Method 3: Reset Network Settings on Brother Printer
If you’ve attempted a WiFi setup before and it failed, old or incorrect configurations might still be stored in your printer’s memory. Resetting the network settings removes outdated credentials and clears the wireless cache, giving you a clean slate to work from.
Steps:
Press Menu > Network > Network Reset.
Confirm the reset by selecting Yes.
After rebooting, repeat the WiFi Setup Wizard.
Method 4: Assign a Static IP Address
When DHCP fails or assigns conflicting addresses, your printer may drop from the network repeatedly. Assigning a static IP address stabilizes the connection and ensures your router always knows where to find the printer.
Steps:
1. Print the network configuration page from the printer settings.
2. Note the current IP address.
3. Log into your router (typically via 192.168.0.1 or 192.168.1.1).
4. Reserve the printer’s IP address in the DHCP settings.
5. On the printer:
Navigate to Menu > Network > TCP/IP > IP Address.
Set Boot Method to Static.
Enter the IP, Subnet Mask, and Gateway.
Method 5: Update Printer Firmware
Your Brother printer’s internal software (firmware) may not be compatible with newer network protocols, especially if it hasn’t been updated in a while. Firmware updates address known bugs, enhance compatibility, and improve WiFi connectivity.
Steps:
Go to Brother’s official downloads page.
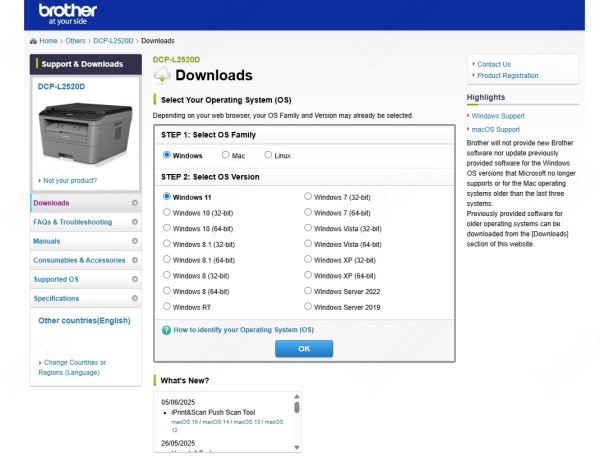
Enter your printer model and download the latest firmware update tool.
Connect your printer to your PC via USB.
Run the firmware updater and follow the on-screen instructions.
Method 6: Reconfigure Wireless Settings Using USB
If your printer has trouble connecting wirelessly and lacks a functional screen, setting it up through a USB connection is an effective alternative. This method uses the official Brother installation software to detect your network and apply the configuration directly through your computer.
Steps:
Download the Brother Printer Driver and Full Software Package.
Install the software with the printer connected via USB.
Choose Wireless Setup when prompted during installation.
Follow the prompts to configure WiFi settings.
Disconnect the USB once configuration completes.
Method 7: Change Router Wireless Mode and Channel
Modern routers offer multiple broadcasting modes and frequency bands, which might not always be compatible with older printer models. By adjusting your router’s settings to a more universally compatible mode, you significantly increase the likelihood of a stable connection.
Suggestions:
Set the router to Mixed Mode (b/g/n) instead of 802.11ax only.
Use 2.4GHz band instead of 5GHz, as most Brother printers don’t support 5GHz.
Change the wireless channel to a fixed one like 1, 6, or 11.
Disable MAC Address Filtering temporarily.
Method 8: Temporarily Disable Antivirus/Firewall
Some third-party security tools can inadvertently block device communication on your network. If your Brother printer works fine on other networks but fails at home, your firewall or antivirus may be interfering with the connection. Temporarily disabling these tools helps confirm if they’re the cause.
Steps:
Disable any third-party antivirus or firewall software temporarily.
Retry connecting the Brother printer to WiFi.
Once connected, re-enable your security software and set exceptions for Brother services.
Method 9: Use WPS Push Button Setup
If your router supports WPS (Wi-Fi Protected Setup), this method offers a fast and secure way to connect your printer without entering a password. It's ideal for users who prefer a hassle-free and password-free wireless setup and have easy access to their router.
Steps:
Press the WPS button on your router.
On the printer, go to Network > WLAN > WPS.
Select WPS Push Button and press OK.
The printer should automatically connect within 2 minutes.
Conclusion: Get Back Online Quickly
If your Brother printer is not connecting to WiFi, don’t panic. Follow the proven solutions outlined above—from resetting the network and assigning a static IP to configuring your printer via USB or app. Connectivity problems are usually solvable with the right approach.
If you're still facing driver-related issues or connectivity glitches, we recommend using Driver Talent — a powerful tool that automatically detects, downloads, and installs the correct drivers for your Brother printer. With one click, you can ensure your drivers are up to date and eliminate many compatibility issues that may prevent your printer from connecting to WiFi.
