When a network connection stops working, most users check the router, toggle Airplane mode, or run the Windows troubleshooter. These steps fix surface-level issues. When the problem is deeper — when the adapter disappears from Device Manager, shows a yellow exclamation mark, or the connection drops immediately after a Windows update — the cause is usually the driver itself, and a full reinstall is what resolves it. This guide covers how to reinstall the network adapter driver on Windows 10 and Windows 11, for both WiFi adapters and wired Ethernet adapters.
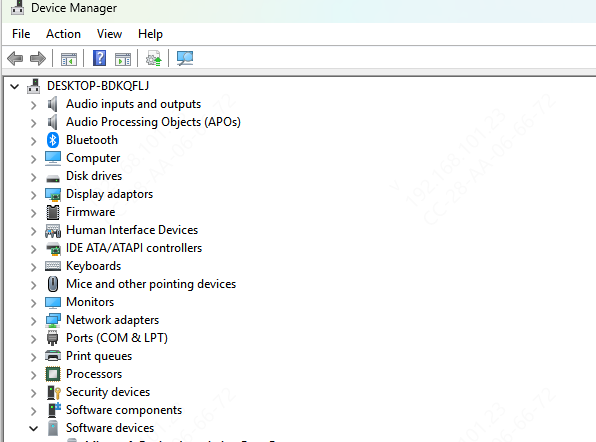
Step 1: Identify the Network Adapter in Device Manager
Before uninstalling anything, identify the exact adapter name. This is necessary for downloading the correct replacement driver.
Press Win + X and open Device Manager. Expand Network Adapters. The wireless adapter will typically be listed as Intel Wireless, Realtek RTL, Qualcomm Atheros, or MediaTek depending on the laptop or motherboard
The wired Ethernet adapter is usually listed as Realtek PCIe GbE Family Controller or Intel Ethernet Connection
Step 2: Download the Replacement Driver Before Uninstalling
This step is critical. Uninstalling the network adapter driver without a replacement already downloaded leaves the PC with no network connection at all — which means no ability to download the new driver after the fact.
For laptops, go to the manufacturer's support site. Download the driver that matches the adapter name identified in Step 1 and your Windows version
For desktops, the network driver comes from the motherboard manufacturer's site if the adapter is built into the motherboard, or from the network card manufacturer's site for add-in cards
Step 3: Uninstall the Current Network Adapter Driver
Open Device Manager. Expand Network Adapters. Right-click the adapter and select Uninstall device
In the confirmation dialog, check the option that reads "Delete the driver software for this device" if it appears
This removes the driver files from the system rather than just removing the device entry — which is the difference between a clean reinstall and a basic device removal. Click Uninstall

Step 4: Install the New Driver and Restart
Run the driver installer downloaded in Step 2. Right-click the file and select Run as administrator. Most manufacturer installers place all required files automatically and require only following the on-screen prompts
After the installation completes, restart the PC. After the restart, open Device Manager and expand Network Adapters. The adapter should now appear without any error icon
For WiFi adapters, connect to a network and test. For Ethernet adapters, plug in the cable and confirm Windows shows the connection as active
Step 5: Reinstall the Network Adapter Driver Automatically with Driver Talent X
When the adapter model is unclear, the laptop manufacturer's support site is difficult to navigate, the downloaded installer fails, or both the WiFi and Ethernet adapters need attention at the same time, Driver Talent X handles the identification and reinstallation automatically
Driver Talent X detects the exact hardware ID of the adapter and installs the manufacturer-matched driver version rather than the generic driver that Windows Update typically substitutes. After the repair completes, restart the PC and test the network connection

What to Do If the Adapter Is Still Missing After Reinstall
If the adapter reappears in Device Manager after the driver reinstall but the internet still doesn't work, the problem has shifted from the driver to the network configuration.
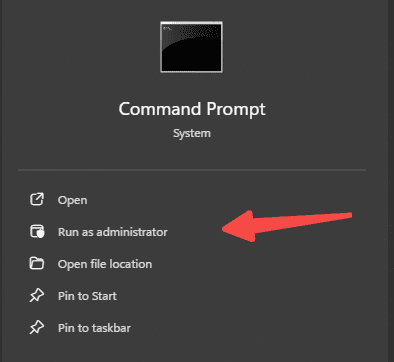
Open Command Prompt as administrator and run the following commands in sequence:
netsh winsock reset
netsh int ip reset
ipconfig /flushdns
Restart the PC after running all three commands. These reset the TCP/IP stack and DNS cache, which often remain misconfigured even after the driver is restored.
Conclusion
Reinstalling the network adapter driver resolves the majority of Windows network failures caused by corruption, post-update driver replacement, or missing driver files. The manual process requires identifying the adapter, downloading the correct driver before uninstalling, performing a clean removal, and installing fresh. The key step most guides omit is downloading the replacement driver first — uninstalling without a replacement ready leaves the PC with no way to get online.
