While using the Windows operating system, many users encounter an issue where the disk usage remains stuck at 100%. This can significantly slow down system performance, cause applications to become unresponsive, and even lead to system freezes or crashes.
In this guide, we'll explore the most common causes of this problem and provide multiple effective solutions to help you restore your computer's smooth performance quickly.
1. Common Symptoms of 100% Disk Usage
Task Manager shows disk usage constantly at 100%
Extremely slow startup after booting
Long delays when opening files, websites, or applications
Fans running loudly despite no heavy programs being open
2. Common Causes of High Disk Usage
Excessive indexing by Windows Search
Outdated or faulty disk drivers
Superfetch (SysMain) service causing resource conflicts
Background Windows updates or disk optimization tasks
Malware or viruses running silently
Browser extensions or third-party software using excessive resources
Improper virtual memory (paging file) settings
3. Practical Fixes for 100% Disk Usage
Method 1: Disable Windows Search Service
Windows Search continually indexes files, which can sometimes consume excessive disk resources.
Press Win + R, type "services.msc", and press Enter.
Find "Windows Search", double-click to open.
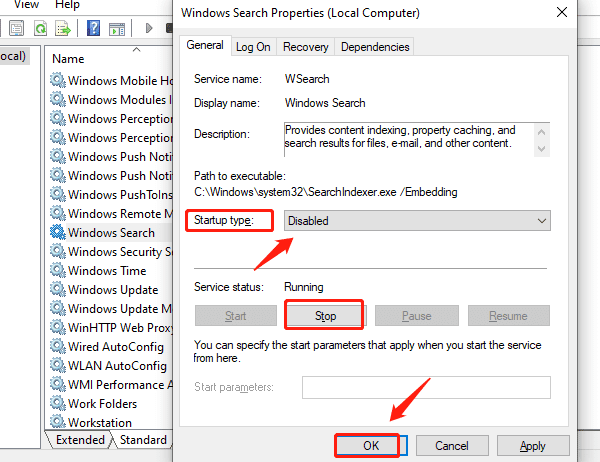
Set Startup type to "Disabled", click "Stop", and apply changes.
Restart the computer and observe disk usage.
Method 2: Update Disk Drivers
Outdated, corrupted, or incompatible drivers are a common cause of high disk usage. It's recommend to use Driver Talent X for quick and safe driver updates.
Click the download button to get the latest version of Driver Talent X
Install and launch the software. Go to the Drivers section and click "Scan".
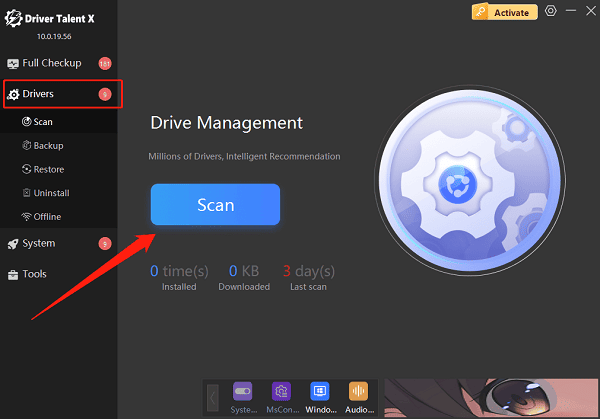
Find the disk driver in the scan results and click "Upgrade".
Restart your computer after updating to apply the changes.
Method 3: Disable SysMain (Superfetch) Service
This service optimizes system boot but may cause high disk usage on some devices.
Press Win + R, type "services.msc", and press Enter.
Locate the "SysMain" service and double-click.
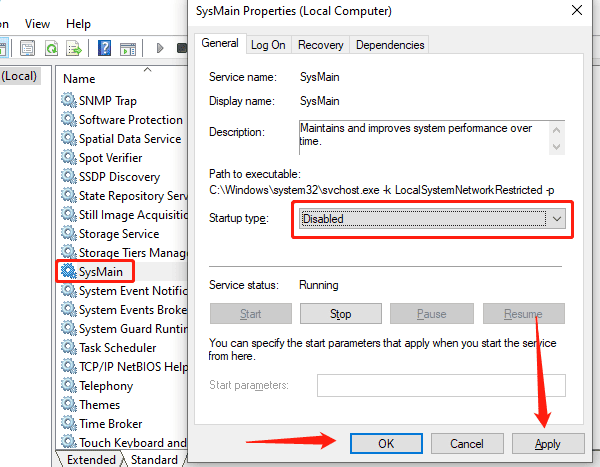
Set the Startup type to "Disabled", click "Stop", and save.
Method 4: Adjust Virtual Memory Settings
Right-click "This PC" > "Properties" > "Advanced system settings".
Under Performance, click "Settings" > "go to Advanced" > "click Change".
Uncheck "Automatically manage paging file size for all drives".
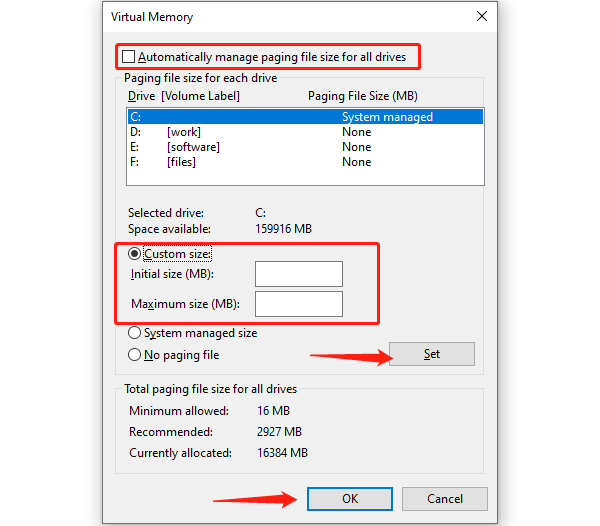
Select your system drive and manually set the initial and maximum size. (Recommended: 1.5 to 3 times the size of your physical RAM)
Click "Set", save changes, and reboot your PC.
Method 5: Run Disk Check Command
Open Command Prompt as Administrator.
Enter the following command: chkdsk C: /f /r /x
Restart your computer; the system will automatically perform the scan and repair.
Method 6: Clean Up Background Tasks Using Task Manager
Press Ctrl + Shift + Esc to open Task Manager.
Go to the "Processes" tab and identify any processes with high disk usage.
If unnecessary, right-click and choose "End Task".
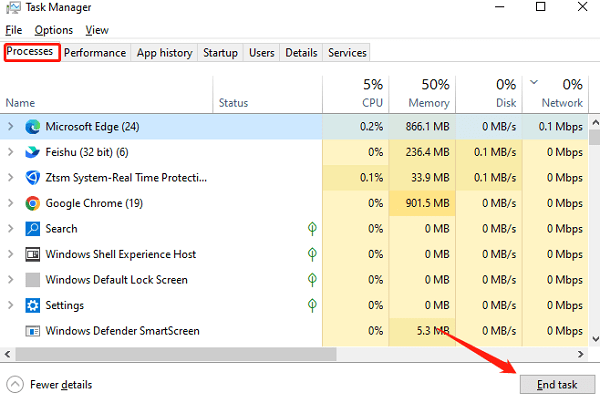
Disable startup programs to improve performance.
Method 7: Scan for Viruses and Malware
Install and run a full scan using security software such as Windows Defender to eliminate malicious programs that might be consuming disk resources.
4. Additional Tips
Upgrade to an SSD: This fundamentally resolves disk bottlenecks common with traditional HDDs
Keep Windows Updated: New updates often fix performance-related issues
Avoid running multiple heavy applications simultaneously
100% disk usage doesn't always indicate a hardware failure. In most cases, it can be resolved with system optimization and configuration changes. If you're facing this issue, try the solutions listed above one by one to restore your PC's performance. If the problem persists, consider backing up your data and reinstalling Windows, or seek assistance from a professional technician.
