Dell docking stations are essential tools for creating a streamlined workspace, allowing you to connect power, displays, and peripherals through a single cable. However, when a dock suddenly stops charging, fails to detect monitors, or loses USB connectivity, it can significantly disrupt productivity. In many cases, these problems are not caused by hardware failure but by outdated drivers, firmware issues, or temporary system glitches. This guide will help you troubleshoot Dell docking station issues, starting with the most effective software update solutions before moving on to hardware-related checks.
Method 1: Update All Drivers and Firmware with Driver Talent X
The most common reason for inconsistent docking station performance is outdated or missing drivers and firmware for the dock itself, the laptop's Thunderbolt or USB-C port, and the integrated graphics. Ensuring all these components are updated simultaneously is the fastest path to stability.
Download and Install:
Click the "Download" button to download the software package.
Install it on your Dell laptop.
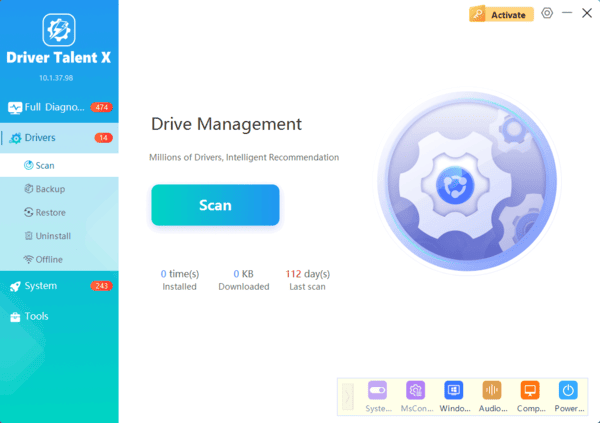
Start a System Scan:
Open the program and go to "Drivers" > "Scan", click "Scan".
The software will perform a deep analysis of all drivers, comparing them against its certified database.
One-Click Update:
After the scan is complete, the software will display a list of all drivers that need attention. Select all relevant drivers and click the "Upgrade" or "Repair Now" button.
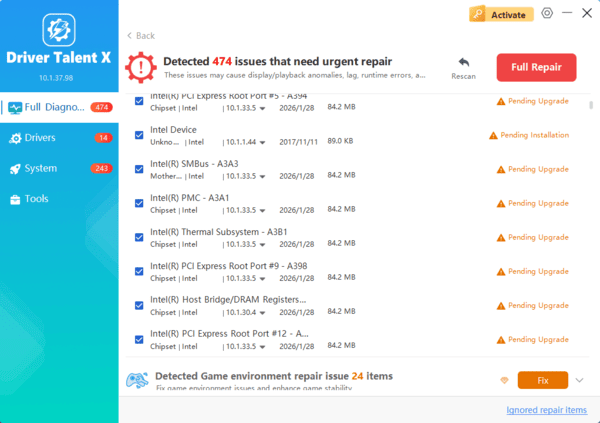
Driver Talent X will download and install the latest, most compatible versions for your specific Dell model.
Restart Your PC:
Restart your laptop to finalize the driver installation and allow the system to re-initialize the docking station connection.
Method 2: The Physical and Power Reset Approach
Docking stations rely on a steady flow of power and a stable connection to function correctly. Temporary electrical states or cable issues are frequent culprits.
Solution 1: Power Cycle the Docking Station and Laptop
A full power cycle drains residual charge and forces the dock and laptop to renegotiate their connection and power contract.
Disconnect Everything: Disconnect the docking station's USB-C or Thunderbolt cable from the laptop.
Unplug Dock Power: Unplug the AC power adapter from the docking station (and the wall outlet).
Discharge Power (Dock): Press and hold the power button on the Dell docking station for at least 30 seconds. This step is crucial for draining residual power.

Discharge Power (Laptop): If the issue persists, perform a hard reset on the laptop by shutting it down, unplugging the AC adapter, and holding the laptop's power button for 30 seconds to discharge the system.
Reconnect: Plug the AC adapter back into the dock. Wait for the dock's LED indicator to stop blinking. Reconnect the dock cable to the laptop.
Solution 2: Inspect and Swap Cables
Faulty or insufficient cables can limit power delivery and video bandwidth.
Check Power Adapter: Ensure the power adapter plugged into the dock is the original Dell adapter and has the correct wattage (often 130W or 180W). A low-wattage adapter may charge the laptop slowly but fail to power external monitors.
Inspect Connections: Disconnect and securely reconnect the USB-C/Thunderbolt cable connecting the dock to the laptop, and all video cables (HDMI/DisplayPort) to the monitors. Check for any damaged or bent pins on the connectors.
Test with New Cables: If possible, test the connection using a known-good, certified USB-C or Thunderbolt cable, as cheap cables often cannot handle the required data throughput for multiple displays.
Method 3: Advanced System and BIOS Troubleshooting
If basic resets and driver updates don't work, you may need to check the laptop's firmware and operating system settings.
Solution 1: Update Dell Laptop BIOS
The Basic Input Output System (BIOS) controls how your laptop communicates with the USB-C and Thunderbolt ports. An outdated BIOS may lack support for newer dock models or stability fixes.
Check BIOS Version: Go to the official Dell Support website and check for a new BIOS update for your specific Dell laptop model.
Install Update: Download and install the BIOS update following Dell's instructions carefully. (Warning: BIOS updates can be risky; ensure your laptop is plugged into the AC adapter throughout the process.)
Reset BIOS to Defaults: After the update, enter the BIOS setup (usually by pressing the F2 key during startup) and select the "Load Optimized Defaults" or "Restore Settings" option to ensure all port configurations are reset to a stable state.

Solution 2: Adjust USB Power Management Settings
Windows may be cutting power to the USB-C or Thunderbolt port to save energy, which disconnects the dock during inactivity.
Open Device Manager: Press the Windows key + X and select "Device Manager".
Locate USB Hubs: Expand the "Universal Serial Bus controllers" section.
Disable Power Saving: Right click on each entry labeled "USB Root Hub" or "USB 3.0 Extensible Host Controller" and select "Properties".
Change Power Management: Navigate to the "Power Management" tab. Uncheck the box that says "Allow the computer to turn off this device to save power". Repeat this for all relevant USB entries.

Conclusion
Resolving a non-working Dell docking station issue involves a tiered approach, prioritizing software stability before moving to hardware troubleshooting.
By starting with a comprehensive driver and firmware update by using Driver Talent X, performing necessary power cycles and physical checks, and finally adjusting advanced BIOS and power management settings, you can successfully restore full functionality to your dock, ensuring your multi-monitor, peripheral-rich setup is back online.
