Intel High Definition (HD) Audio driver manages audio input and output for systems relying on Intel's integrated chipset sound. When the driver fails, you experience issues like no sound, crackling audio, or unrecognized audio devices.
This problem is highly common after major Windows updates or system changes. This comprehensive guide provides step-by-step solutions to restore your audio, starting with the most efficient method.
Part I: Driver and Software Integrity
The most frequent cause of Intel HD Audio failure is a corrupted, outdated, or generic driver overriding the correct one.
Method 1: Automated Driver Update with Driver Talent X
Manually troubleshooting integrated audio drivers often requires updating the main Intel chipset driver alongside the audio driver itself. A specialized utility automates this complex coordination, ensuring the correct, compatible files are installed.
Download and Install:
Click the "Download" button to download the software package.
Install it on your Windows PC.
Run Scan:
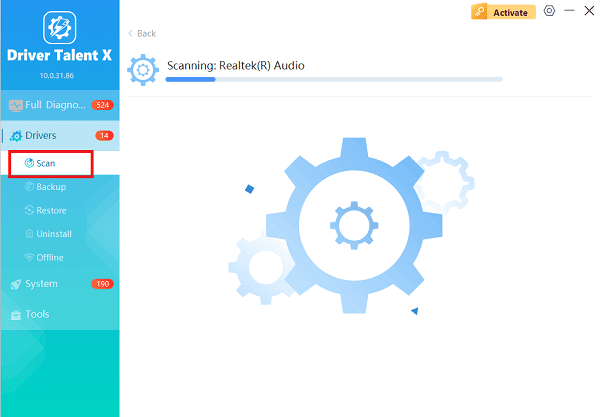
Launch the application and go to "Drivers" > "Scan", click "Scan".
The software will perform a deep analysis, focusing on your audio devices and critical Intel chipset components.
Install the Update:
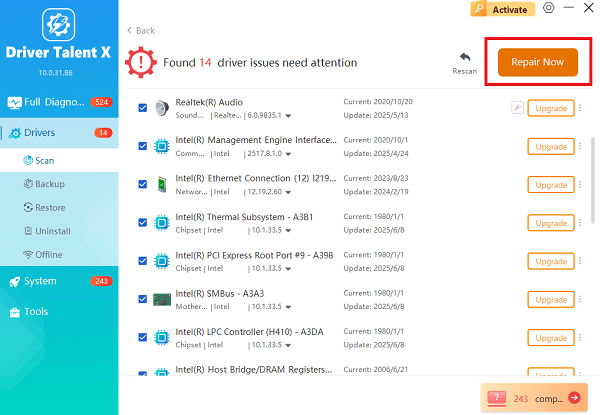
After the scan is complete, the software will display a list of all drivers that need attention.
Select the necessary drivers and click the "Upgrade" or "Repair Now" button. Driver Talent X will download the latest, certified versions from Intel.
Restart Your PC:
After the installation is complete, restart your computer.
A fresh set of stable drivers should resolve the audio issue immediately.
Method 2: Roll Back the Driver in Device Manager
If the audio stopped working immediately after a recent Windows update, rolling back the driver may fix the conflict.
Press Windows Key + X and select "Device Manager".
Expand the "Sound, video and game controllers" category.
Right-click on "Intel High Definition Audio" or the audio controller entry.
Select "Properties", then go to the "Driver" tab.
If available, click "Roll Back Driver". (This option is only available if a previous driver version is saved).
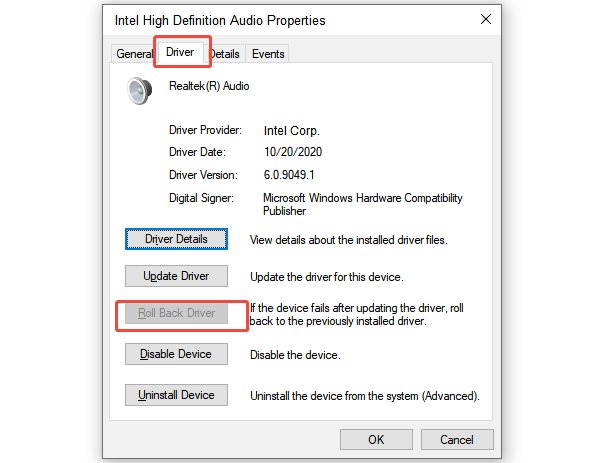
If you roll back the driver, restart your PC and test the audio.
Part II: Windows Settings and Service Checks
If the drivers are current, the issue may be a simple setting or a disabled Windows service.
Method 1: Ensure Audio Services Are Running
The Windows Audio service must be running for any sound output to work.
Press Windows Key + R, type "services.msc", and press Enter.
In the Services window, scroll down and find the following services:
Windows Audio
Windows Audio Endpoint Builder
Multimedia Class Scheduler
Ensure the Status for all three is "Running" and the Startup Type is set to "Automatic".
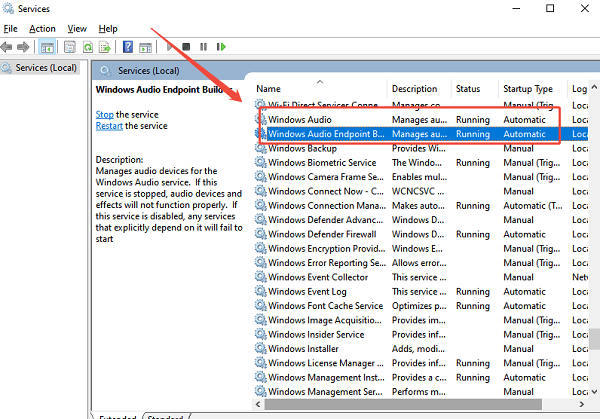
If a service is stopped, right-click it and select "Start".
Method 2: Configure Default Playback Device
Windows may be incorrectly sending audio to a device that is not connected (e.g., a disconnected HDMI monitor).
Right-click the Speaker icon in your taskbar and select "Open Sound settings" or "Open Sound mixer".
Under the "Output" section, click the drop-down menu for "Choose your output device".
Ensure your correct output device (e.g., Speakers/Headphones or Realtek/Intel HD Audio) is selected.
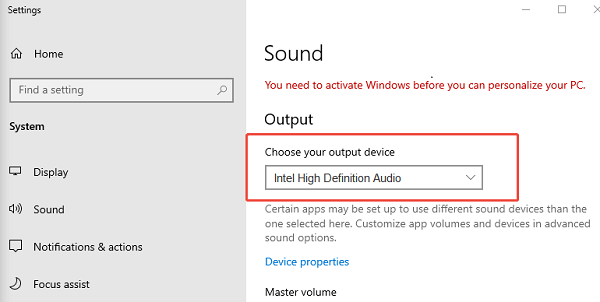
Try disabling and re-enabling the device in the Sound settings to refresh the connection.
Part III: Advanced Troubleshooting and Reinstallation
For persistent problems, a complete removal and clean reinstallation of the audio component is necessary.
Manual Reinstallation via Device Manager
This method forces Windows to find and load a fresh, clean version of the audio driver.
Press Windows Key + X and select "Device Manager".
Expand the "Sound, video and game controllers" category.
Right-click on "Intel High Definition Audio" and select "Uninstall device".
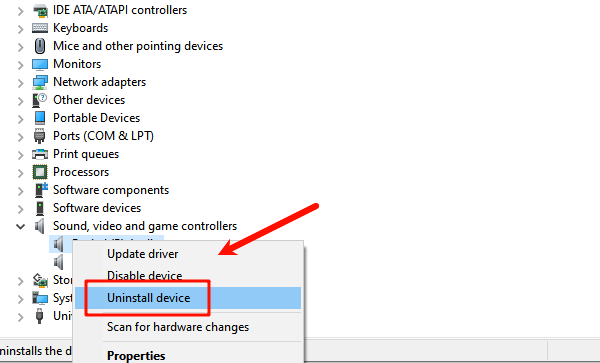
Crucially, check the box that says "Attempt to remove the driver software for this device". This performs a deep clean.
Restart your PC. Upon reboot, Windows will detect the "new" hardware and automatically install a basic, working driver.
If the audio still doesn't work, proceed to Method 1 to install the full, correct driver package via Driver Talent X or manually via the Intel website.
Conclusion
A non-working Intel High Definition Audio driver is usually a simple driver failure, easily fixed by performing a clean installation. The most efficient strategy is to update drivers with Driver Talent X.
By confirming that the Windows Audio services are running and the correct Playback Device is selected, you can reliably restore sound to your system.
