You connect the ThinkPad to the dock and nothing works the way it should. The monitors stay dark. USB devices plugged into the dock aren't recognized. The Ethernet port doesn't hand off a connection. Or the laptop isn't charging through the dock at all. ThinkPad docking stations require multiple driver components and firmware to function fully. One missing or corrupted component can break specific functions while everything else works normally. This guide covers the full range of fixes, from physical checks to driver and firmware solutions.
Fix 1: Check Physical Connections
For ThinkPad mechanical docks with the proprietary connector, the laptop needs to be pressed firmly and squarely onto the dock until it clicks. A partial connection produces erratic behavior where some functions work and others don't
For USB-C and Thunderbolt docks, unplug the cable from both the dock and the laptop, wait 10 seconds, and reconnect firmly. Check that the dock's power adapter is connected to both the dock's power input and a working wall outlet, and that the power LED on the dock is illuminated
A dock without power will not charge the laptop or power connected USB devices, but it may still pass a partial signal that makes the problem look software-related

Fix 2: Update Dock Drivers
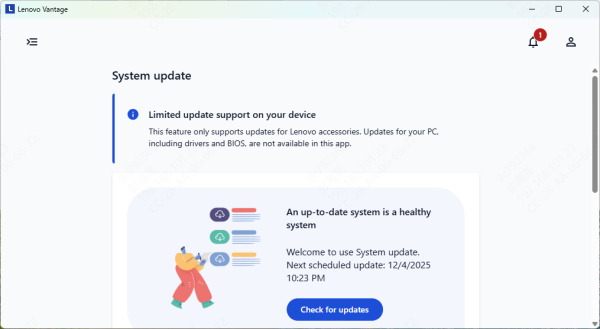
Lenovo Vantage
Open Lenovo Vantage and go to Device, then System Update. Run a scan for available updates
Look specifically for entries related to the docking station — these may appear as ThinkPad USB-C Dock Driver, ThinkPad Thunderbolt 4 Dock Driver, or Docking Station Driver depending on the dock model. Install all dock-related updates and restart
Driver Talent X
When Lenovo Vantage is not installed, isn't detecting the dock, or when a Windows update broke multiple dock components simultaneously, Driver Talent X provides a faster alternative that covers all dock hardware components in a single scan
ThinkPad docks expose multiple devices to Windows — a DisplayLink or MST display adapter, a USB hub controller, an Ethernet controller, and sometimes an audio device. Driver Talent X detects all of these and identifies the correct driver for each without requiring manual navigation of Lenovo's support pages

Fix 3: Update Dock Firmware
Dock firmware is separate from Windows drivers. It controls how the dock handles USB device negotiation, power delivery, display output initialization, and hardware compatibility with the laptop. Outdated firmware causes problems that no driver update can fix — the hardware-level behavior needs to change first.
Go to LENOVO SUPPORT and search for your specific dock model
Download the firmware update utility for your dock
Before running it, confirm the dock is connected to the laptop and the power adapter is plugged into a working outlet
Run the utility and do not disconnect the dock or interrupt power during the update

Fix 4: Update ThinkPad BIOS and Thunderbolt Firmware
ThinkPad BIOS updates frequently include compatibility improvements for docking stations, particularly for Thunderbolt and USB-C models. If the dock stopped working after a ThinkPad BIOS update, or if the BIOS is significantly outdated, this update is worth applying.
Open Lenovo Vantage, go to System Update, and check for BIOS and Thunderbolt firmware updates
Install any available updates and follow the on-screen instructions — BIOS updates require the laptop to be plugged into AC power and will restart the system as part of the process

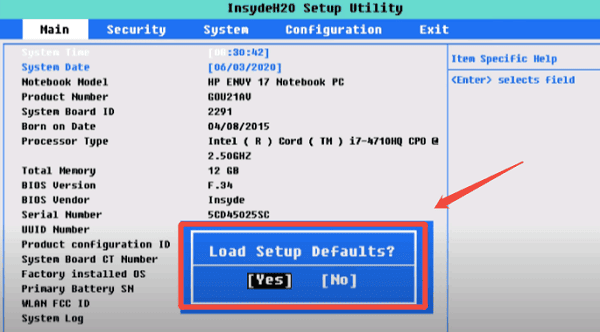
Fix 5: Check Thunderbolt Security Settings in BIOS
ThinkPad laptops with Thunderbolt ports have a security level setting in BIOS that controls which Thunderbolt devices are allowed to connect. If this setting is configured to High Security or Secure Connect, the dock may not be recognized until it has been explicitly approved — or it may not connect at all
Restart the ThinkPad and press F1 during the Lenovo splash screen to enter the BIOS. Navigate to Config, then Thunderbolt (TM) 4 or USB4, depending on the ThinkPad generation. Find the Thunderbolt Security Level setting
Change it to No Security to allow the dock to connect automatically without requiring approval each session. Save and exit the BIOS. Reconnect the dock and test
Conclusion
Physical connection and power checks resolve many ThinkPad docking station issues immediately. Dock firmware updates and driver reinstallation fix the majority of software-related failures. When multiple dock functions are broken simultaneously, Driver Talent X repairs all dock driver components in a single scan without requiring separate downloads for each device. Thunderbolt security settings in BIOS are a frequently missed cause of dock non-detection and should be checked on any ThinkPad using a Thunderbolt dock.
