Seeing a "No Signal" message on your HP Desktop Monitor can be frustrating, especially when your computer seems to be running.
This common issue indicates that your monitor isn't receiving a video signal from your PC. While it might seem like a major problem, the cause is often simple and can be fixed with a few troubleshooting steps.
This guide shows you step by step how to fix the "No Signal" error, starting with connection checks and then software fixes. For a quick solution, just click the "Download" button to get Driver Talent X.
Step 1: The Essential Physical Troubleshooting Checklist
Before you assume a major hardware or software failure, perform these basic checks. Most "No Signal" issues are solved here.
Check All Cables: Ensure the power cable is securely plugged into both the back of your HP monitor and the wall outlet. More importantly, check the video cable (HDMI, DisplayPort, or VGA) is firmly connected to both the monitor and the back of your computer.
Try Different Ports: If your PC has multiple video ports (e.g., both on the graphics card and the motherboard), try plugging the video cable into a different port. This can help rule out a faulty port.
Power Cycle Everything: Turn off your computer and your monitor. Unplug all power cables from both devices. Press and hold the power button on both your PC and monitor for about 30 seconds to drain any residual power. Then, plug everything back in and turn on your computer first, followed by your monitor.

Check the Correct Input: Use the buttons on your HP monitor to access its on-screen menu. Make sure the input source is set correctly to match the cable you're using (e.g., HDMI, DisplayPort).
Step 2: The Software & Driver Fixes (In Safe Mode)
If the physical checks fail, the problem is likely with your graphics card driver. A corrupted or outdated graphics driver can prevent your PC from sending a video signal.
Since you can't see the screen, you'll need to boot your PC into Safe Mode to fix it. Safe Mode uses a basic display driver, allowing you to see the screen and perform repairs.
How to Boot into Safe Mode?
For Windows 10/11:
Power on your PC and when the Windows logo appears, press and hold the power button to force a shutdown. Repeat this three times.
On the fourth boot, Windows will enter the Automatic Repair environment.
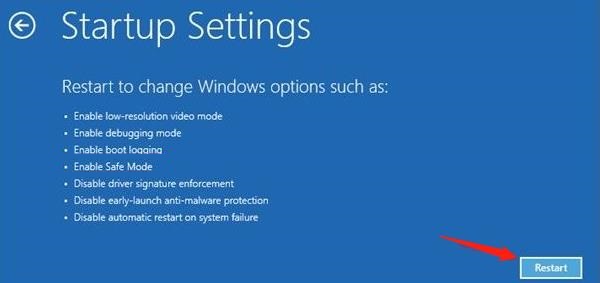
Select "Troubleshoot" > "Advanced options" > "Startup Settings" > "Restart".

After the PC restarts, you will see a list of options. Press 4 or F4 to enter Safe Mode.
Once in Safe Mode, you can proceed with the driver update.
Method 1: Fix Way with Driver Talent X (Recommended)
For a quick, hassle-free solution that automatically finds and installs the correct drivers, Driver Talent X is an excellent choice. This professional driver management tool automates the entire process, making it safer and more convenient than manual updates.
Step 1: Scan for Outdated Drivers in Safe Mode
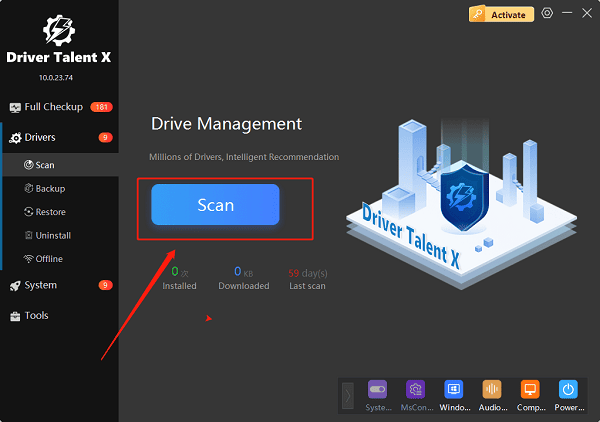
Before entering Safe Mode, install and launch Driver Talent X.
Click the "Scan" button.

The software will perform a deep scan of your system, automatically detecting all outdated, missing, or corrupted drivers, especially your crucial graphics driver.
Step 2: Update the Graphics Driver with One Click
After the scan is complete, Driver Talent X will show a clear list of all drivers that need updating.
Find your graphics driver (e.g., NVIDIA, AMD, or Intel) on the list.
Simply click the "Upgrade" button next to the driver's name.
Driver Talent X will automatically download and install the latest, most compatible driver. Once the installation is complete, restart your PC, and your monitor should receive the signal.
Method 2: Manual Update via Device Manager (In Safe Mode)
If you prefer to handle the process manually, you can use Windows' built-in Device Manager while in Safe Mode.
Step 1: Open Device Manager in Safe Mode
Right-click the Windows Start button and select "Device Manager" from the list.
Step 2: Find Your Graphics Card
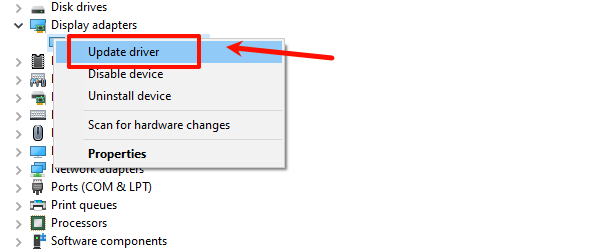
In the Device Manager window, expand the "Display adapters" section.
Right-click on your graphics card's name (e.g., NVIDIA GeForce GTX 1660 Ti).
Step 3: Update the Driver
Select "Update driver".

Choose "Search automatically for drivers". Windows will then search online for an updated driver and install it if one is found.
Q&A
Q: Why is my monitor showing a "no signal" message?
A: This is usually due to a physical disconnection, a bad video cable, or a corrupted graphics driver that is preventing your PC from sending a video signal to the monitor.
Q: Why do I need to boot into Safe Mode?
A: Safe Mode bypasses the normal driver loading process and uses a generic display driver. This allows you to see the screen and run troubleshooting steps and driver installations that you wouldn't be able to otherwise.
Q: My monitor still says "no signal" after all this. What's next?
A: If you've tried all these steps and the issue persists, the problem may be a hardware failure. Try testing your PC with a different monitor or testing your monitor with a different computer. If the problem follows the PC, your graphics card may be faulty.
Conclusion
A "No Signal" message on your HP Desktop Monitor is a common and fixable problem.
By first checking all your physical connections and then updating your graphics driver in Safe Mode, you can almost always resolve the issue.
While manual methods are effective, using Driver Talent X is the safest and most efficient solution. It simplifies the entire process and ensures your PC runs flawlessly.
