Maintaining up-to-date and correctly installed device drivers is essential for the longevity, performance, and stability of your Lenovo laptop or desktop. Outdated drivers are the most common cause of issues like system crashes, Wi-Fi instability, slow boot times, and poor peripheral functionality on Lenovo devices (including ThinkPad, IdeaPad, and Legion models).
A safe and successful driver update requires a structured approach: first ensuring a stable system foundation, then using official tools to apply the correct, manufacturer-specific updates. This comprehensive guide provides step-by-step solutions for downloading and safely installing all necessary Lenovo drivers.
Method 1: Lenovo Vantage
Lenovo provides pre-installed software, often called Lenovo Vantage or System Update, which scans your specific hardware by serial number and delivers only Lenovo-approved updates.
1. Launch Utility: Search for and open the Lenovo Vantage application (or the classic Lenovo System Update tool).
2. Check for Updates: Navigate to the "System Update" or "Driver and Software Update" section within the application.

3. Install Critical Updates: The tool will check the Lenovo servers for updates specific to your device, including:
BIOS/UEFI Firmware (Crucial for hardware compatibility).
Power Management Driver (Essential for battery health).
Specialized Interface Drivers (For function keys, touchpads, etc.).
4. Install and Restart: Select the recommended updates, install them, and follow all prompts to restart your PC to finalize the installations.

Method 2: Download from the Lenovo Support Website
This method is best for users performing a clean Windows installation or those needing a specific driver file.
Find Serial Number: Locate your laptop's serial number (usually on a sticker on the bottom).
Go to Support: Visit the official Lenovo Support website and enter your serial number.

Select Drivers: Navigate to the "Drivers & Software" section and select your operating system (Windows 10 or 11).
Installation Order: Download drivers by category. For best results on a new OS installation, install in this order: Chipset > Power Management > Storage > Graphics > Audio > Networking.
Method 3: Update with Driver Talent X
Manually searching for and updating the numerous drivers required for a Lenovo system can be tedious and prone to installing incorrect versions, which leads to system instability. A specialized utility streamlines this process by identifying and installing the correct, compatible driver versions customized for your specific Lenovo model.

Download and Install:
Click the "Download" button to download the software package.
Install it on your Lenovo PC.
Run Scan:
Launch the application and go to "Drivers" > "Scan", click "Scan".
The software will perform a deep analysis of your system, focusing on all core Lenovo components, especially those related to stability and performance.

Execute Update:
After the scan is complete, the software will display a list of all drivers that need attention. Select the necessary drivers and click the "Upgrade" or "Repair Now" button.
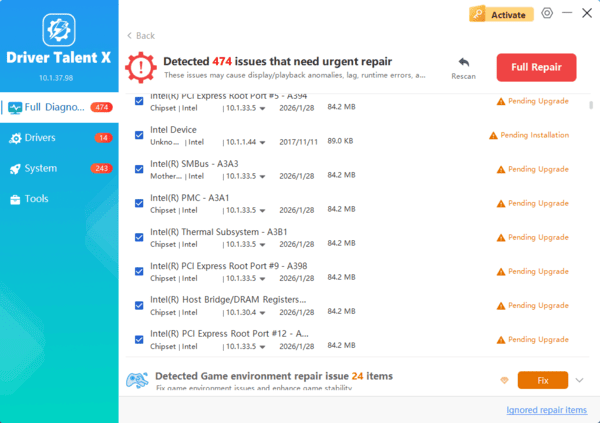
Driver Talent X will download the latest, certified versions specific to your Lenovo hardware, which is critical for smooth operation.
Troubleshooting and Configuration Fixes
These steps address common roadblocks encountered during or after the driver update process.
Clean Reinstallation
If a specific component (like a network card or webcam) is malfunctioning after an update, a clean reinstallation can fix the corrupted driver files.
Press Windows Key + X and select "Device Manager".
Expand the relevant category (e.g., "Network adapters" or "Cameras").
Right-click on the faulty device and select "Uninstall device".

Check the box to delete the driver software.
Click "Action" > "Scan for hardware changes". Windows will automatically detect the device and load a fresh, default driver.

Check Windows Update
Windows Update sometimes carries certified Lenovo drivers that have passed Microsoft testing and can resolve immediate stability issues.
Press Windows Key + I to open Settings.
Go to "Update & Security" > "Windows Update" > "Advanced options".
Click "Optional updates" > "Driver updates". If any Lenovo or system-related drivers are listed, select and install them.

Conclusion
Maintaining a stable and high-performing Lenovo device is directly dependent on diligent driver management. The most reliable strategy is to first ensure system-wide driver synchronization and stability with Driver Talent X.
By combining this foundational approach with the official Lenovo Vantage application and performing clean reinstallation on malfunctioning components, you guarantee an efficient, secure, and up-to-date operating experience.
