A Lenovo laptop that will not turn on can stop your work completely, but this problem is rarely as serious as it first appears. The majority of cases come down to a power management issue, a peripheral conflict, a static charge buildup, or a driver problem that prevents the boot sequence from completing. This guide covers every confirmed fix in a logical order, starting with the most common causes and working toward advanced firmware-level solutions.
Part 1: Fix Driver Issues to Prevent Recurring Boot Failures
If your Lenovo laptop boots intermittently or turns on but crashes before reaching Windows, driver corruption is likely contributing to the problem. Fixing this now prevents the no-boot situation from returning after the immediate issue is resolved.
Chipset and ACPI power management drivers control how the laptop manages power states during startup. When these are outdated or corrupted, the laptop may fail POST, hang at the Lenovo logo, or power on and immediately shut back down
Manually identifying and replacing these drivers requires knowing your exact Lenovo model, locating the correct drivers on Lenovo's support site, and installing them in the right order, which is time-consuming and easy to get wrong
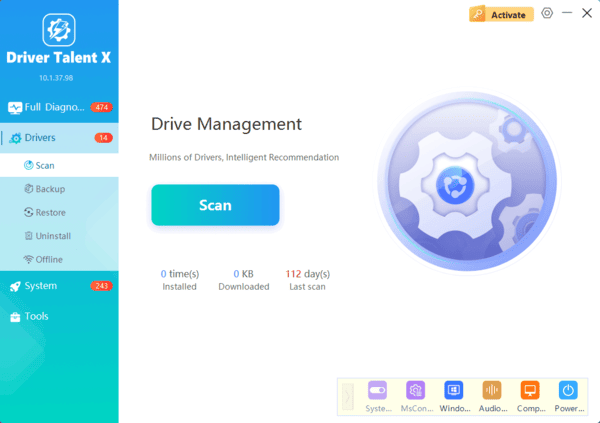
Driver Talent X automates this process. It performs a deep scan of your installed drivers, identifies which ones are outdated or damaged, and installs the correct OEM-specific versions for your Lenovo model
Part 2: Power and Hardware Reset Solutions
Method 1: Perform a Hard Reset to Discharge Static Electricity
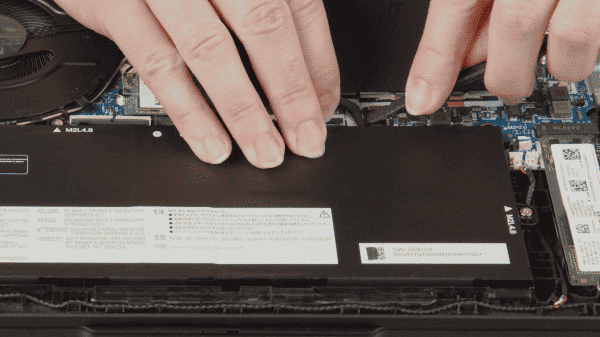
Unplug the AC adapter and remove every connected peripheral including USB devices, external monitors, docks, and SD cards. If your Lenovo model has a removable battery, take it out. Press and hold the power button for 30 to 60 seconds
This drains all residual charge from the system's capacitors. Reconnect only the AC adapter, leaving the battery out if it was removable, and attempt to turn the laptop on. If it powers on, shut it down normally, reinsert the battery, and boot again to confirm stable operation
Method 2: Verify the Power Supply and Connections
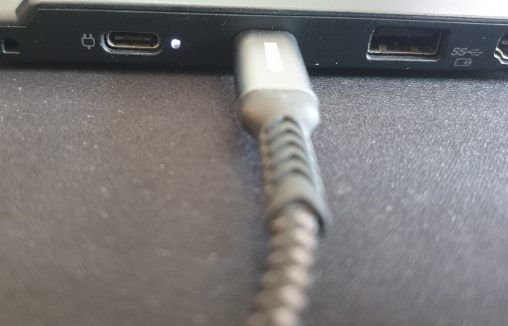
Check the AC adapter's indicator light. If the light on the adapter brick is off, the adapter itself may be faulty or the outlet it is plugged into is not working
Test the same adapter in a different outlet. If the adapter light turns on but the laptop still does not respond, inspect the charging port on the laptop for bent pins, debris, or physical damage
Ensure the connector seats firmly without wobbling. Try a different AC adapter of the same wattage if one is available
Method 3: Use the Emergency Reset Pinhole
Many Lenovo laptops include a small pinhole reset button on the bottom casing that safely interrupts the internal power circuit. This is distinct from the Novo button and is designed specifically for situations where the laptop cannot be powered on through normal means
Turn the laptop over and locate the small pinhole on the bottom panel, which is sometimes labeled with a reset icon. Insert a bent paperclip or SIM eject tool and press and hold the button inside for 5 to 10 seconds. Remove the tool, reconnect the AC adapter, and attempt to power on the laptop normally
Part 3: Peripheral and Display Troubleshooting
Method 1: Disconnect All External Devices
Connected peripherals are a frequent cause of POST failures. A malfunctioning USB device, hub, or external drive can prevent the system from completing its hardware initialization sequence
Disconnect everything from the laptop: USB devices, HDMI cables, DisplayPort cables, docking stations, SD cards, and any other connected hardware. Attempt to boot with only the AC adapter connected. If the laptop turns on successfully, reconnect peripherals one at a time and reboot after each one to identify which device is causing the conflict
Method 2: Test for a Display Failure Rather Than a Power Failure
The laptop may be running normally but appear dead because the screen is not showing an image. A failed display, a loose internal display cable, or a projection setting that redirected output to an external monitor can make the laptop appear to be off when it is actually on
Look for activity indicators. If the power light, keyboard backlight, or Caps Lock LED turns on when you press the power button, the system is running and the issue is with the display rather than startup
Connect the laptop to an external monitor or TV using an HDMI or DisplayPort cable. If the image appears on the external display, the laptop's screen or its internal connection to the motherboard is the source of the problem

Part 4: Advanced Firmware and System Recovery
Method 1: Reset BIOS to Default Settings
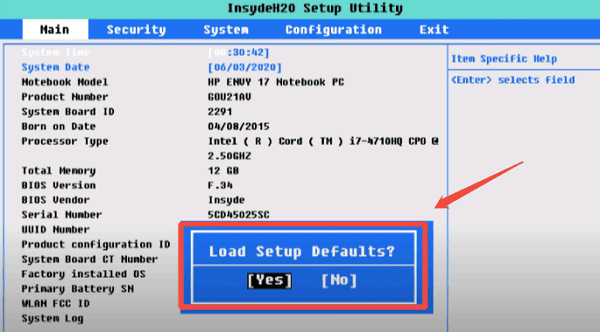
If the laptop powers on but fails to reach Windows, incorrect or corrupted BIOS settings may be preventing the system from booting correctly
Turn the laptop on and immediately press the BIOS entry key repeatedly. On most Lenovo models this is F1, F2, or the Fn + F2 combination. Some models use F12 or Delete. Once inside the BIOS, navigate to the Exit tab and select Load Setup Defaults or Load Optimized Defaults
Save the changes and exit. The laptop will restart with factory BIOS settings restored
Method 2: Run Windows Startup Repair
If the laptop powers on and begins loading Windows but fails before reaching the desktop, Windows Startup Repair can fix corrupted boot files automatically
If the laptop fails to boot normally three times in a row, Windows will automatically load the Recovery Environment on the next attempt. From the recovery menu, select Troubleshoot, then Advanced options, then Startup Repair. The utility will scan the boot partition and attempt to repair any damaged files. This process may take several minutes. Restart the laptop when it completes
Method 3: Use the Novo Button to Access Recovery
Lenovo laptops include a dedicated Novo button that bypasses the normal boot sequence and launches the recovery menu directly. This button is separate from the standard power button and is typically located near it or on the side of the laptop, sometimes recessed in a small pinhole
With the laptop powered off, press the Novo button using a paperclip or SIM tool. A menu will appear offering options including System Recovery and BIOS Setup. Select System Recovery to access Windows recovery tools, or BIOS Setup to check and reset firmware settings without needing to time the F-key entry during normal startup
Conclusion
A Lenovo laptop that will not turn on most commonly fails due to static charge buildup, a power supply issue, a peripheral conflict, or driver corruption. The hard reset procedure and AC adapter verification resolve the majority of cases immediately. For laptops that fail intermittently or crash during startup, updating chipset and ACPI drivers with Driver Talent X addresses the underlying driver instability that causes recurring boot failures. Working through the methods in the order above covers every common cause and moves from the fastest fixes to the more involved firmware-level solutions only when necessary.
